⚡ The Quick Catch
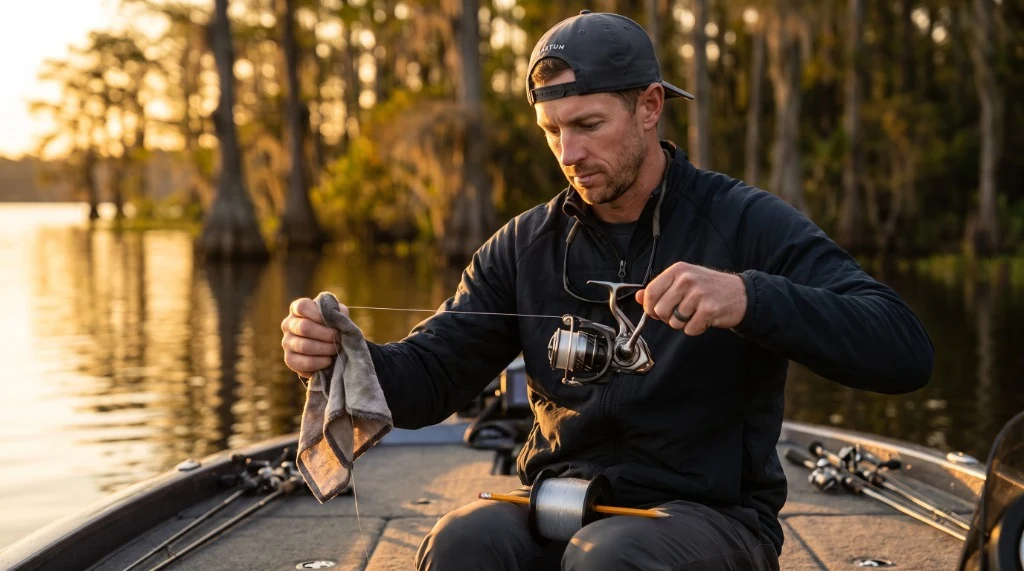
Spooling a reel wrong costs you fish — not from bad luck, but from preventable line twist, backlash, and slippage that happen before you ever make your first cast. This guide walks you through the exact mechanical process for all three major reel types: spinning, baitcasting, and spincast. Follow the geometry rules, nail the arbor knot, and you'll leave the dock with line that lays flat, holds under load, and casts the full distance your setup is capable of.
Tactical Overview
- 1. The Core Concept — Spooling Geometry
- 2. Equipment Setup — What You Need
- 3. Step-by-Step Technique Breakdown
- 4. Reel & Line Situational Adjustments
- 5. Advanced Variations & Pro Tweaks
- 6. Pros & Cons Assessment
- 7. Who Should Learn This First
- 8. Frequently Asked Questions
- 9. Pro Tips & Key Takeaways
1. The Core Concept — Why Spooling Geometry Matters
Every reel type stores and releases line through a fundamentally different mechanical system. Understand the geometry of each, and every spooling decision — direction, tension, fill level — makes logical sense. Skip this part, and you're guessing.
Spinning reels use a stationary spool with a rotating rotor and bail wire that wraps line around the spool in coils. Because the spool doesn't rotate during retrieval, line comes off the front of the spool in loops during a cast. If those loops have built-in twist from incorrect spooling, they tighten under load and create the dreaded coil-spring tangle 20 feet into a cast.
Baitcasting reels use a rotating spool that spins on its axis during both casting and retrieval. Line pays off the spool perpendicularly to the spool's rotation — similar to how line comes off a garden hose reel. This means twist is far less of a concern on a baitcaster, but spool fill level and line lay uniformity directly control backlash frequency and casting distance. If you're calibrating magnetic or centrifugal braking, check out our guide on Baitcaster Maintenance & Tuning.
Spincast reels (the closed-face push-button reels) operate similarly to spinning reels internally — a fixed spool with a rotating pickup pin — but are enclosed in a nose cone that further restricts line flow. They're the most forgiving of the three, but they still suffer from twist and overfill problems if spooled carelessly.
🎣 Field Note: The Cost of Overfilling
I once watched a tournament partner lose a 5-pound largemouth at the net because his fluorocarbon snapped at the knot — not from the fish's weight, but from line that had been digging into itself on the spool all day due to overfilling. He'd loaded his spinning reel to the absolute rim. The line bite had weakened the top 30 feet of his mainline without him knowing it. We've both been religious about the 1/16-inch rule ever since.
When Conditions Favor Respooling
You should respool your fishing reels when:
- Water temperature drops below 45°F and you've been using monofilament — cold stiffens mono and amplifies memory coils significantly, especially when targeting deep winter patterns in our Cold Weather & Ice Fishing Guide.
- You notice consistent line twist during retrieval (line bunching or spiraling off the spool).
- The line has been on the reel for more than one full season of regular use. In fact, leading line manufacturer Berkley recommends replacing monofilament at least once a year due to unavoidable UV exposure and water absorption degrading its nylon polymer chains.
- You've had a significant abrasion event — dragging over rocks, dock pilings, or heavy shell beds during Topwater Frog Fishing in Heavy Cover.
- You're switching techniques — moving from monofilament to braid or fluorocarbon for light-line finesse presentations like the Drop Shot Rig or Ned Rig System.
For fluorocarbon specifically, technical data published by premium fluorocarbon producer Sunline confirms fluorocarbon's higher memory retention compared to monofilament — which means its stiffer PVDF polymer chains retain spool curvature more aggressively and benefit tremendously from proper tensioned spooling technique.
2. Equipment Setup — What You Actually Need
You don't need a bulky motorized line winder machine to spool correctly. You need the right line for your reel type, a reliable arbor connection, and a way to apply consistent tension:
| Component | Recommendation | Why It Matters |
|---|---|---|
| Mainline (Spinning) | 6–17 lb monofilament or 10–30 lb braid with mono backing (tested on reels like the Shimano Sedona FI and Pflueger President) | Mono lays flat and fills evenly; braid needs a non-slip base |
| Mainline (Baitcaster) | 12–20 lb fluorocarbon or 30–65 lb braid (paired with workhorse reels like the Shimano SLX DC or Curado DC) | Fluoro's low stretch improves sensitivity; braid handles power applications |
| Mainline (Spincast) | 6–12 lb monofilament | Mono's flexibility suits the enclosed nose cone geometry |
| Heavy Inshore / Saltwater | 20–50 lb braid on high-capacity reels (such as the Penn Battle IV or Daiwa BG) | Demands tight cross-wrap tension to prevent braid bite under heavy drag loads |
| Mono Backing (for braid) | 10–15 lb monofilament (15–20 wraps) | Creates friction base so braid doesn't spin freely on spool arbor |
| Arbor Knot | Standard double-overhand arbor knot | Simple, strong, won't slip under load; trim tag end close |
| Tension Tool | Folded microfiber cloth or foam pad | Applies consistent pressure without cutting into the line or fingers |
| Pencil or Dowel | Standard pencil through the line spool center | Allows the supply spool to spin freely and feed line without kinking |
| Line Cutters | Sharp braid scissors or line clippers | Ragged cuts fray knot tag ends and create weak points |
| Electrical Tape (optional) | 1–2 wraps over mono backing or bare arbor | Eliminates any residual slip on slick aluminum or graphite arbors |
For a deeper breakdown of how different line materials behave under load and casting conditions, see our comprehensive Fishing Line Guide which covers monofilament, fluorocarbon, and braid across all technique categories.
3. Step-by-Step Technique Breakdown
Part A: Spooling a Spinning Reel
Orient the Supply Spool Correctly
Lay the line spool flat on the floor or a table with the label facing up. Open the bail on your spinning reel. The line must come off the supply spool in the same rotational direction that your reel's rotor wraps it onto the spool. To check: watch which direction the line coils off the supply spool as you pull it upward — it should match the direction your bail rotates.
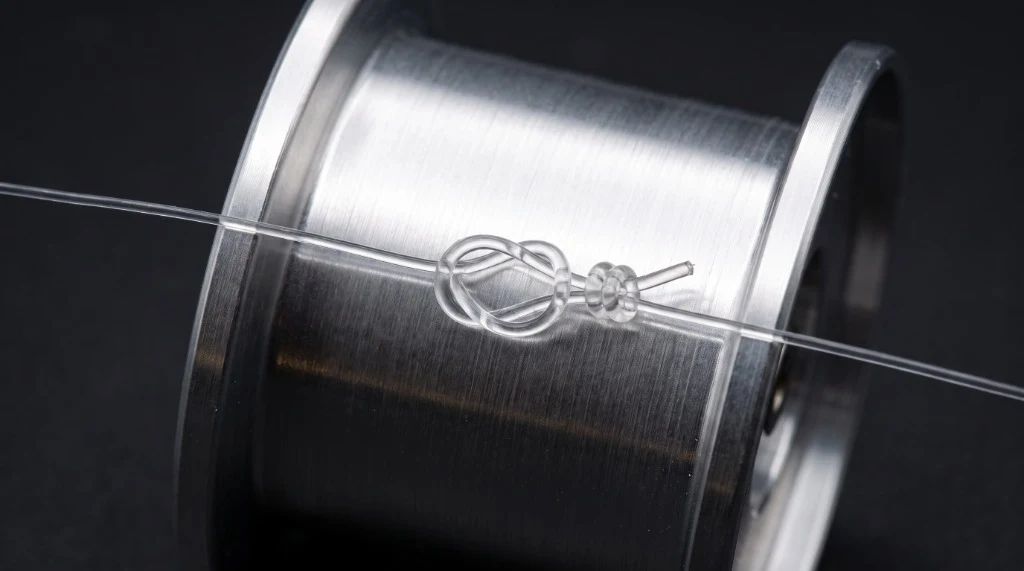
Tie the Double Overhand Arbor Knot
Thread the line through all rod guides from tip to butt (or just the first guide if you're spooling off the reel). Wrap the line once around the spool arbor. Tie an overhand knot around the mainline with the tag end, then tie a second overhand knot in the tag end alone as a stopper. You can follow the animated step-by-step arbor knot diagram at AnimatedKnots to see the two overhand loops cinch against the spool. Pull the mainline to seat the knot tight against the arbor. Trim the tag end to within 1/8 inch of the knot.
Apply Backing If Using Braid
Spool 15–20 wraps of 10 lb monofilament onto the arbor first using the arbor knot. Then connect your braid to the mono tag end using a double uni knot or Alberto knot (5 turns on each side, pulled tight and wetted before cinching). This mono base creates enough surface friction that braid won't slip. For heavy drag setups, see our guide to Braid to Fluorocarbon Leader Connections.
Tension the Line During Fill
Hold a folded cloth or foam pad between your thumb and index finger. Run the mainline through the cloth with moderate pressure — enough that the line is taut and slightly resistant as you reel, but not so tight you're stretching monofilament. Reel at a steady, moderate pace. Avoid fast cranking, which causes the line to bounce on the spool and lay unevenly.
Stop at the Exact Mechanical Threshold
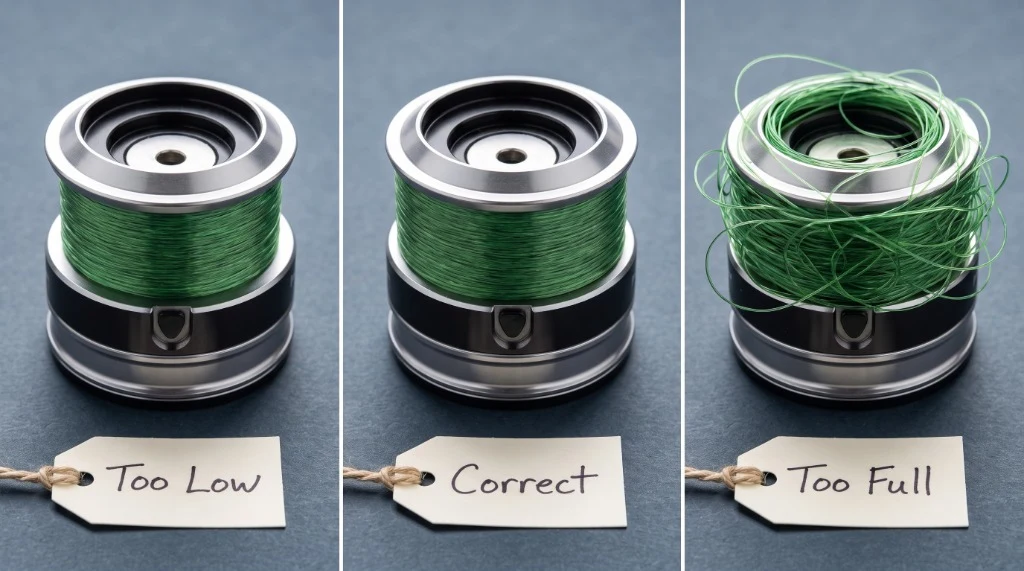
Fill the spinning reel spool to within 1/16 to 1/8 inch of the spool lip. This is not a rough estimate — it's a mechanical threshold. Underfill by more than 3/16 inch and you create extra line-to-lip friction on every cast, costing you 10–20% of your casting distance. Overfill past the lip and line jumps off the spool in large coils during the cast, creating tangles at the first guide.
Part B: Spooling a Baitcasting Reel
Thread Line Through the Level Wind Guide First
Before tying anything, thread the line through the level wind (worm gear) guide on the front of the reel. This is the small ceramic or metal guide that traverses back and forth across the spool during retrieval. Many anglers skip this and tie the knot first — then realize they have to cut the line and start over.
Tie the Arbor Knot & Mount Supply Spool Horizontally
Tie the double-knot arbor system to the spool. On baitcasters, the spool rotates, so the knot must be tight and the tag end trimmed flush to prevent it from catching on the level wind guide. Place a pencil through the supply spool center so it spins horizontally as line feeds directly off the top.
Apply Tension and Spool with Label Facing Up
Hold the supply spool so the label faces up (toward the ceiling) and the line pays off the top. Run the line through your cloth tension pad. Engage the reel and begin cranking. Watch the level wind guide — it should traverse smoothly, distributing line evenly across the spool. If it's piling up on one side, your supply spool angle is off.
Fill to Within 1/8 Inch of the Spool Flange
On a baitcaster, fill to within 1/8 inch of the spool flange (the raised edge of the spool). Unlike spinning reels, baitcasters are more forgiving of slight underfill — but overfill is severely punished. An overfilled baitcaster spool will produce backlash on nearly every cast above moderate speed because the line has nowhere to go when the spool decelerates. For rod pairing recommendations, review our analysis on Rod Action & Power Calibration.
Part C: Spooling a Spincast Reel
Spincast reels are the most mechanically forgiving. Remove the nose cone (usually a quarter-turn counterclockwise), thread the line through the hole in the nose cone, tie your arbor knot to the spool inside, replace the cone, and spool under light tension to within 1/8 inch of the spool's internal capacity marker (usually a raised ring inside the cone). Monofilament in the 6–10 lb range is the correct choice for most spincast applications.
4. Reel-Type & Line-Type Situational Adjustments
Different line types and reel configurations require specific adjustments to the spooling process. The table below covers the most common real-world combinations:
| Reel Type | Line Type | Key Adjustment | Watch Out For |
|---|---|---|---|
| Spinning | Monofilament | Label-up supply spool; fill to 1/16" from lip | Memory coils in cold water (below 45°F) |
| Spinning | Fluorocarbon | Same orientation; use higher tension due to stiffness | Fluoro sinks — check for line lay gaps from stiffness |
| Spinning | Braid | Mono backing (15 wraps) or electrical tape; fill to 1/8" | Overfill causes spool jump; no stretch means hard hooksets dig in |
| Baitcasting | Fluorocarbon | Label-up; even level wind distribution | Fluoro memory causes casting issues in cold weather |
| Baitcasting | Braid | Direct arbor tie acceptable with tape; fill to 1/8" from flange | Overfill = instant backlash on power casts |
| Baitcasting | Monofilament | Standard process; lower tension acceptable | Mono stretches under tension — can compress lower layers |
| Spincast | Monofilament | Light tension; fill to internal capacity marker | Stiff line jams the nose cone pickup pin |
Cold weather note: Below 45°F water temperature, monofilament stiffens considerably. In practice, this means you should strip the top 20–30 feet of monofilament and respool in cold conditions if you've noticed increased coiling, or switch to a low-memory copolymer or braid for cold-weather applications.
5. Advanced Variations & Pro Tweaks
1. The Warm Water Soak for Memory Removal
New monofilament and fluorocarbon straight off the factory spool has memory from being coiled tightly for months. Before spooling, submerge the entire supply spool in warm (not hot) water — around 90–100°F — for 20–30 minutes. The heat relaxes the polymer structure, reducing memory significantly. You'll notice the line lays flatter on the reel and casts with less coiling resistance on the first session. Don't use boiling water — it degrades nylon monofilament's tensile strength.
2. The Pencil Tension Method for Solo Spooling
If you're spooling alone without a second person to hold the supply spool, run a pencil through the center hole of the supply spool and hold both ends between your knees while seated. The pencil acts as an axle, allowing the spool to spin freely while you apply tension with your dominant hand through the cloth pad and reel with your other hand. This is the standard field method used by tournament anglers respooling in a hotel room the night before a tournament.
3. Braid-to-Fluorocarbon Leader Connection for Spinning Reels
For finesse applications where you want the sensitivity and no-stretch properties of braid with the low-visibility of fluorocarbon at the business end, spool braid as your mainline and connect a 12–24 inch fluorocarbon leader using an Alberto knot or FG knot. Compare the profile and knot efficiency in our FG Knot vs Palomar Knot Breakdown, or explore our companion tutorial on Spinning Reel Spooling Mechanics and Mono vs Fluoro Leaders.
6. Pros & Cons Assessment
Spooling Best Practices Pros
- Eliminates the #1 source of casting failures: line twist, coiling, and bird's nests.
- Proper fill level maximizes casting distance by minimizing lip friction.
- Mono backing prevents total line slippage under heavy drag loads.
- Arbor knot is ultra-compact and will not catch on level wind guides.
- Consistent tension creates uniform line lay that eliminates line bite.
Spooling Realities & Cons
- Manual spooling without a helper requires the pencil-knee technique.
- Fluorocarbon stiffness requires extra thumb pressure and warm water prep.
- Overfilling even slightly causes instant spool jump and guide tangles.
- Adding backing introduces a connection knot that must be tied properly.
7. Who Should Learn This First (and Who Can Skip It)
Essential for:
- Any angler purchasing a new reel or fresh line who wants full casting performance.
- Tournament anglers who respool frequently before events and must do it solo.
- Anglers transitioning from mono to braided lines where arbor slippage is a real risk.
- Anyone troubleshooting chronic backlash on a baitcaster or wind knots on spinning gear.
You can skip this if:
- You exclusively pay a local tackle shop to machine-spool all your reels (though knowing the mechanics lets you inspect their fill levels).
- You fish exclusively with pre-spooled combos and never replace damaged line.
Frequently Asked Questions
My spinning reel line twists badly after 20–30 casts. I spooled it correctly — what's happening?
How much does line diameter affect how I spool a baitcaster?
Can I put braided line directly on a baitcaster without backing?
My baitcaster develops a hard backlash specifically on the first cast after a cold front. What's the spooling connection?
How do I know when my line is too old to trust, even if it looks fine?
Does it matter which direction I reel when filling a baitcaster?
What's the best way to remove severe memory from monofilament that's already on the reel?
How do I handle the line-to-backing knot on a spinning reel — will it cause problems passing through the guides?
9. Pro Tips & Key Takeaways
- The 20-wrap twist test is non-negotiable for spinning reels. Run 20 wraps, drop slack, and check for coiling before committing to a full fill.
- Fill level is a precision measurement. 1/16–1/8 inch from the spinning spool lip; 1/8 inch from the baitcaster flange.
- Mono backing for braid is cheap insurance. 15 wraps of 10 lb mono tied with an arbor knot guarantees zero slipping under drag.
- Tension during spooling controls lay quality. Use a folded cloth to apply moderate, even pressure throughout retrieval.
- Warm water soak eliminates factory coil memory. 20 minutes in 90°F water relaxes polymer chains for flatter line lay.
Alex Mercer
Alex is a tournament bass angler specializing in light line applications, drop shot, Ned rig, and spinning gear mechanics across Southeast and Midwest fisheries. His rigging guides focus on eliminating line twist and maximizing casting distance.
Cite This Work
To cite this comprehensive spooling and line management guide in research or editorial content:
Ready to Rig Your Next Setup?
Explore our pro-tested fishing line reviews and in-depth knot tutorials to build an unbreakable connection between rod, reel, and lure.