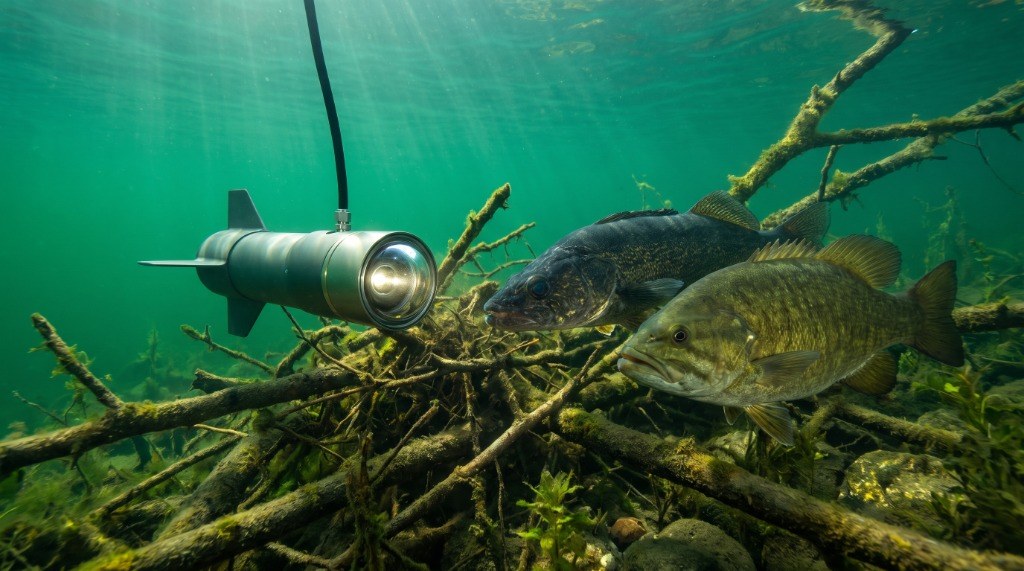
The Quick Catch
Sonar estimates underwater density through acoustic echoes, leaving you guessing whether a mark tucked inside submerged brush is a trophy walleye, a carp, or a waterlogged tree limb. Deploying an underwater fishing camera alongside your traditional 2D CHIRP or Side Imaging unit eliminates acoustic dead zones and provides 100% visual verification of species, forage size, and real-time strike mechanics. By pairing acoustic search electronics with optical confirmation, you stop casting to empty cover or nose-tight fish that refuse your presentation, cutting unproductive water time in half across both open-water structure and mid-winter hardwater.
Tactical Overview & Guide Context
- 1. The Core Concept — Visual Truth vs Acoustic Interpretation
- 2. Equipment Setup & Camera Rigging Mechanics
- 3. Step-by-Step Technique Breakdown & The Ice Fishing Two-Hole Blueprint
- 4. Murky Water Optics & Seasonal Adjustments: Infrared (IR) vs White LED
- 5. Advanced Variations, Pro Tweaks & Side-by-Side System Comparison
- 6. Pros & Cons Assessment
- 7. Who Should Buy an Underwater Camera (And Who Should Stick to Sonar)
- 8. Frequently Asked Questions
- 9. Pro Tips & Key Takeaways
1. The Core Concept — Visual Truth vs Acoustic Interpretation
Understanding the underwater fishing camera vs sonar equation begins with signal physics. Even if you have mastered how to read a fish finder, your transducer does not actually "see" fish. A sonar unit transmits an acoustic pressure wave—typically between 83 kHz and 200 kHz for 2D CHIRP, or up to 1.2 MHz for high-definition imaging—and measures the time-of-flight and amplitude of the reflected echo. Because a fish's flesh is roughly the same density as water, 85% to 90% of a sonar return actually bounces off the gas-filled swim bladder, where the sharp acoustic impedance mismatch between water and air creates a high-amplitude reflection.
This physical limitation creates three major blind spots on the water:
- Species Ambiguity: A 6-pound common carp, a 6-pound freshwater drum, and a 6-pound trophy walleye possess nearly identical swim bladder volumes. On a 2D CHIRP screen, all three paint the exact same thick, red-core target arch.
- The Acoustic Dead Zone: When a sonar cone hits a sloping rocky ledge or a dense brush pile, the sonar unit locks onto the shallowest point of the beam's outer edge as the "bottom." Any bass or walleye pinned inside a depression or wedged beneath a horizontal tree limb sits inside the acoustic dead zone—completely invisible to traditional 2D sonar.
- Behavioral Blindness: Even forward-facing live sonar reduces a fish to an acoustic blob. It cannot show you whether a smallmouth's dorsal spines are pinned flat (neutral/inactive) or fully erected (aggressive/feeding), nor can it reveal the exact micro-forage—such as emerging bloodworms or 1.5-inch rusty crayfish—littering the substrate.
An optical fish finder camera solves all three problems instantly. By placing a low-lux CMOS or CCD image sensor directly at target depth, you convert guesswork into hard visual intelligence. You see the exact species, the subtle flare of a crappie's gill plates as it inhales and expels a jig in 0.3 seconds without moving your rod tip, and the precise composition of the bottom transition. As professional tournament anglers emphasize in tactical field analyses from Wired2Fish on Underwater Camera Bottom-Truthing, deploying an optical lens directly into deep structure confirms whether acoustic marks represent target gamefish or non-target rough fish, while eliminating false reads on deep structure.
Field War Story — The Lake Lanier Timber Trap
During a late-July practice session on Lake Lanier, my 200 kHz 2D CHIRP screen painted seven massive spaghetti arches suspended 32 feet down inside the crown of a submerged white oak. After burning 45 minutes pitching a 1/2-ounce tungsten football jig into the branches without a single tick, I clipped a 1.5-pound downrigger ball onto my camera cable and dropped the lens into the timber—only to discover my "trophy spotted bass" were actually fourteen 12-pound river cooter turtles wedged onto the horizontal limbs! That two-minute optical check saved me three hours of tournament time I would have wasted grinding on dead water.
When Conditions Favor This Technique
Deploying an underwater fishing camera yields the highest tactical return when acoustic sonar hits its physical resolution ceiling. Look for these specific environmental windows:
- Water Clarity (Secchi Disk > 3.0 Feet): Optical range is strictly governed by suspended particulate concentration. In oligotrophic northern glacial lakes, Great Lakes basins, or highland reservoirs with 8 to 20 feet of Secchi visibility, a camera transforms into an underwater drone. In stained rivers or algae-blooming reservoirs, you need at least 24 to 36 inches of visibility to inspect individual brush piles or ice jigs.
- Post-Cold-Front High Pressure (> 30.20 inHg): When a severe cold front pushes barometric pressure above 30.20 inHg and brings bright, cloudless skies, walleye, yellow perch, and largemouth bass pin their bellies directly into the bottom silt or burrow deep into coontail weed mats. Standard sonar cannot separate their swim bladders from the bottom echo, whereas a horizontally oriented lens spots their pectoral fins fanning inches off the mud.
- Water Temperature Extremes (33°F–42°F and 78°F–86°F): During the winter hardwater period (33°F to 39°F under the ice) and the summer thermocline lockup (when surface temps exceed 80°F and dissolved oxygen forces fish onto tight offshore structure between 22 and 40 feet), fish congregate in high-density, low-movement zones. Because the fish are stationary, slow-speed vertical camera scouting dominates.
- Complex Vertical Cover: Submerged timber, bridge pilings, zebra mussel boulder fields, deep crib structures, and sharp weed-edge transitions where acoustic side-lobes scatter and mask fish targets.
2. Equipment Setup & Camera Rigging Mechanics
Learning how to use an underwater camera for fishing without tangling cables or staring at a spinning, disoriented video feed requires mechanical discipline. Out of the box, most factory camera cables retain coiling memory from the spool. If you simply toss a naked camera housing overboard on a 50-foot cable, the internal copper and Kevlar strands will unwind slightly under tension, causing the lens to spin continuously in a circle while water currents push the housing sideways.
To stabilize your optical feed, you must engineer your setup around two distinct deployment architectures: Vertical Drop Staging (from a stationary or drifting boat, kayak, or dock) and In-Line Trolling Rigging (casting or pulling a miniature camera directly on your main fishing line).
Vertical Drop & Cable Staging (Boat, Kayak, and Dock)
When scouting deep rock piles, cribs, or brush from a boat after marking targets via how to read Side Imaging sonar, your camera must track straight down with zero rotational yaw.
- Directional Fin & Ballast Weighting: Never deploy a suspended camera without its directional stabilizer fin and an auxiliary bottom weight. In open water or mild wind drift (0.3 to 0.8 mph), clip a 12-ounce to 24-ounce pancake downrigger weight or flat-sided bank sinker to the lower harness eyelet beneath the camera housing. The flat profile acts as a keel, aligning the camera lens directly into the oncoming drift while keeping the Kevlar cable vertical.
- Viewing Strut Angle Calibration: Most professional camera housings feature slotted stainless steel brackets or clip-on dorsal fins that allow you to set the lens angle at 90° (horizontal), 45° (downward-angled), or 0° (straight down). Use the 90° horizontal slot ONLY on flat bottoms with zero snags. When scouting boulder fields or standing timber from a boat, lock the harness into the 45° downward-viewing position so you can see approaching obstacles before the lens collides with a jagged limb.
- Kevlar Cable Bend-Radius Protection: A standard underwater fishing camera with monitor uses a 1.8mm to 2.5mm multi-conductor coaxial cable jacketed in braided Kevlar with a breaking strength of 50 to 100 pounds. While Kevlar resists straight-line snapping, hanging the cable directly over a sharp aluminum gunwale creates a pinch point that fractures the internal 28-gauge copper video leads. Always route the cable through a dedicated portable underwater camera boat mount—such as a Scotty #0241 combination side/deck mount paired with an extendable aluminum camera pole, or a RAM Tough-Claw holding a smooth-grooved pulley wheel—to maintain a minimum 2-inch bend radius.
- Monitor Sun-Shielding & Polarized Glass Conflict: If you wear polarized sunglasses on the boat deck, tilting your head can turn a standard LCD camera monitor completely black due to cross-polarization between your lenses and the screen's polarizing film. Mount your monitor inside a deep, three-sided sun hood at chest height, and choose an IPS (In-Plane Switching) panel rated at 500 to 1,000 nits of brightness.
In-Line Trolling Setup (Fishing Line Cameras)
When you want to record strike mechanics on crankbaits, spoons, or live-bait rigs while moving at 1.2 to 3.5 mph, a heavy cabled monitor system creates far too much hydrodynamic drag. This scenario demands a self-contained fishing line camera (such as a water wolf camera or castable fishing camera) that threads directly onto your fishing line ahead of the lure and records 1080p video onto an internal MicroSD card.
- Mainline & Leader Architecture: Spool a medium-heavy baitcasting or trolling rod with 30 lb to 50 lb low-stretch braided mainline (0.28mm to 0.36mm diameter). Do not attach an in-line trolling fishing camera to light monofilament; losing a camera to a frayed knot or northern pike bite-off is an expensive mistake.
- Anti-Twist Swivel Isolation: Crankbaits and trolling spoons generate torque that transmits up the leader. If the leader twists, the camera barrel rolls, rendering your footage unwatchable. Tie a #4 Sampo ball-bearing swivel at the front nose eye of the camera tube, and attach a second ball-bearing swivel at the rear attachment pin.
- Optimal Leader Setback (36 to 48 Inches): Tie a 36-inch to 48-inch leader of 15 lb to 25 lb 100% fluorocarbon between the rear camera swivel and your lure. Why 36 to 48 inches? Underwater wide-angle lenses (typically 120° field of view) suffer from barrel distortion close to the glass. A 3-foot to 4-foot setback keeps a wobbling plug or swimbait dead-center in the frame while allowing trailing predators to enter the field of view without bumping the camera housing.
- Buoyancy & Dive-Curve Tuning: In-line cameras come with brass ballast weights (usually 6g, 9g, and 12g) that slide into the belly channel. For slow-trolling live crawler harnesses at 1.0 to 1.5 mph, snap in the 6g weight for near-neutral buoyancy. For trolling deep-diving plugs or spoons at 2.5 to 3.5 mph, lock in the 12g brass weight to prevent the camera nose from planing upward and blowing out of the strike zone.
| Component | Recommendation | Why It Matters |
|---|---|---|
| Primary Viewing Unit | 7-Inch IPS Monitor (1000TVL or 1080p HD, >500 Nits) | Eliminates surface glare on bright water or snow; resolves subtle gill movement and fin posture. |
| Image Sensor | 1/3" Sony CMOS or CCD rated at ≤ 0.01 Lux | Captures natural ambient light down to 40+ feet without requiring artificial LED illumination. |
| Cable Assembly | 50 ft to 100 ft Kevlar-Braided Coaxial (80 lb test) | Prevents abrasion cuts against zebra mussels, sharp ice bottom edges, and submerged timber. |
| Boat Deployment Mount | Scotty Portable Clamp + 48" Telescoping Aluminum Pole | Keeps Kevlar cable off sharp gunwales and lets you hand-steer the camera direction from the console. |
| Down-Viewing Ballast | 16 oz Flat Pancake Weight on 6" Dropper Loop | Stops rotational cable spin in currents and shields the camera housing from striking bottom rocks first. |
| In-Line Trolling Setup | 40 lb Braid Mainline + Dual Ball-Bearing Swivels + 42" Fluoro Leader | Eliminates torsional roll from wobbling lures and keeps the bait centered in the 120° optical cone. |
| Power Supply | 12V 9Ah or 10Ah LiFePO4 (Lithium Iron Phosphate) Battery | Maintains a flat 12.8V discharge curve in sub-freezing temps; provides 9–12 hours of continuous runtime. |
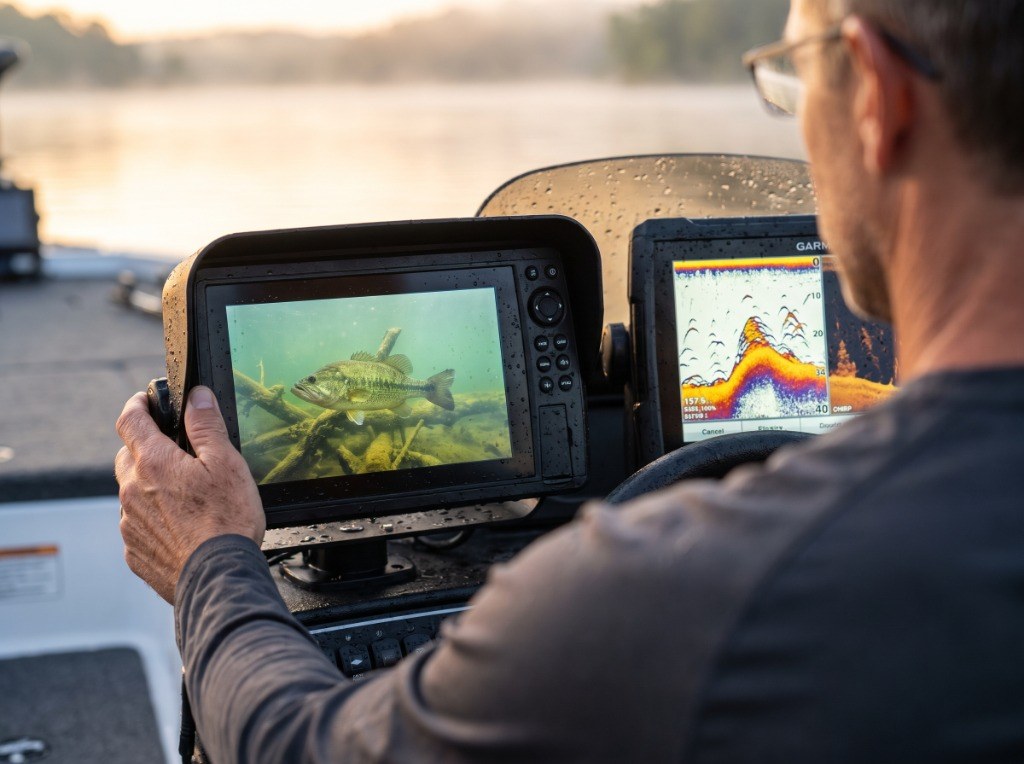
Dual-screen console synchronization: Pairing a high-bright IPS camera monitor inside a sunshield hood (left) with 2D CHIRP sonar and DownScan structure returns (right) to eliminate acoustic dead zones.
3. Step-by-Step Technique Breakdown & The Ice Fishing Two-Hole Blueprint
Deploying an optical system efficiently requires a repeatable workflow. If you drop a camera blindly before establishing your macro-position with sonar and GPS, you will spend the entire afternoon staring at an empty desert of silt. Follow this six-step sequence to synchronize your sonar with your camera on both open water and ice.
Step-by-Step Deployment Workflow
Acoustic Macro-Scanning & Waypoint Pinning
Physical Action: Idle across the target structure at 3.0 to 4.5 mph using your primary chartplotter/sonar combo—such as the unit covered in our Garmin ECHOMAP UHD2 73sv review—and drop a GPS waypoint directly on the hardest bottom transition, rock pile apex, or brush pile edge.
Visual/Sensory Cue: Watch your Side Imaging or Down Imaging palette for bright yellow/white high-amplitude returns accompanied by distinct acoustic shadows cast against the softer mud background.
Common Mistake: Stopping the boat and dropping the camera the moment you see a single fish arch on 2D sonar, rather than pinpointing the exact structural feature holding the school.
Boat Positioning or Ice Hole Boring
Physical Action: On open water, engage your trolling motor's GPS spot-lock 10 feet upwind of the waypoint and let the stern settle directly over the target. On hardwater, bore your camera access hole and jigging hole according to the Two-Hole Geometry (detailed below).
Visual/Sensory Cue: Feel the trolling motor prop stabilize against the wind drift, or watch slush clear the ice hole to reveal clean water with zero ice chips blocking the lens path.
Common Mistake: Spot-locking while the boat hull still has forward momentum, which causes the boat to swing 15 feet backward and drags your lowered camera straight through the middle of a brush pile.
Ambient Light Calibration Before Submersion
Physical Action: Power on the monitor, disable all white LEDs and infrared (IR) diodes so the camera defaults to 100% natural ambient light mode, and lower the camera 2 feet below the surface to verify white balance and focus.
Visual/Sensory Cue: The monitor should display a crisp, clear view of your submerged hand or jig with natural color saturation and zero artificial glare.
Common Mistake: Turning the built-in LED lights on high at the surface and leaving them on during the descent, which immediately illuminates suspended surface plankton and blinds your screen on the way down.
Controlled Free-Spool Descent & Bottom Contact
Physical Action: Feed the Kevlar cable hand-over-hand at a steady pace of 1 to 2 feet per second until the auxiliary bottom weight (or the camera housing itself on clean bottoms) touches the substrate, then immediately raise the cable 12 to 18 inches and lock it into the cable cleat or panner clamp.
Visual/Sensory Cue: Watch the monitor for a sudden narrowing of the field of view followed by a soft puff of silt or sand as the weight touches down, then a wide horizontal vista as you lift the lens 1 foot off bottom.
Common Mistake: Dropping the camera too fast and letting the lens crash directly into soft muck, coating the glass port in clay and forcing a full retrieval to wipe it clean.
360-Degree Optical Sweep & Orientation Lock
Physical Action: Slowly rotate the camera pole, cable, or motorized ice fishing camera panner in 30-degree increments, pausing for 4 full seconds at each stop so the digital image sensor can adjust exposure and your eyes can detect subtle movement against camouflaged rock or weed cover.
Visual/Sensory Cue: Look for the white tip of a walleye's lower tail lobe, the vertical black bars of a yellow perch, or the rhythmic flash of a crappie's silver gill plate hovering motionless inside shade pockets.
Common Mistake: Spinning the cable continuously with your fingers, which turns the video feed into a motion-blurred smear and prevents you from spotting stationary fish resting on the bottom.
Presentation Sync & Visual Strike Execution
Physical Action: Lower your jig, drop-shot, or live-bait rig until it enters the top third of the monitor frame, then work the bait with micro-cadences dictated strictly by the fish's pectoral fin and body posture on screen.
Visual/Sensory Cue: Watch the fish elevate its nose angle by 15 to 30 degrees, flare its gill covers, and suck the bait inside its mouth—then sweep the rod tip upward before you ever feel weight on the line.
Common Mistake: Waiting to feel a physical "tick" through the rod blank while watching a fish inhale the bait on screen; by the time you feel a pressured crappie or walleye on slack line, it has already tasted the metal hook and ejected the lure.
The Two-Hole Geometry for Hardwater
When deploying the best underwater camera for ice fishing, dropping your camera cable down the exact same 8-inch ice hole you are jigging in is a recipe for disaster. The moment you hook a 4-pound walleye or an aggressive northern pike, the fish spirals in wide circles beneath the ice sheet, wrapping your 4-pound fluorocarbon line five times around the Kevlar camera cord and shearing your line off on a treble hook.
Instead, execute the Two-Hole Tactical Geometry:
- Hole Spacing (3 to 5 Feet Apart): Check your camera's maximum optical visibility range under the ice first. In clear water (8+ feet of visibility), drill your camera hole 4 to 5 feet away from your jigging hole. In stained water (3 to 4 feet of visibility), drill the camera hole 2.5 to 3 feet away from your jigging hole. Always orient the camera hole slightly up-current if fishing a river backwater or flowage so the stabilizing fin naturally points the lens straight toward your bait.
- The 45-Degree High-Angle Overwatch: Never rest the camera flat on the bottom mud when jigging for active panfish or walleye. Set your camera harness to a 45-degree downward pitch and suspend the lens 12 to 24 inches ABOVE the depth of your jig. This elevated bird's-eye angle accomplishes two things: it frames both your jig and the bottom substrate simultaneously, and it allows you to spot bottom-hugging perch and walleye approaching from 6 feet out before they ever enter the vertical cone of your flasher. (For a full breakdown of how acoustic flasher cones behave on hardwater, read our ice fishing electronics and flashers guide.)
- Motorized Camera Panner Integration: Trying to pinch and twist a stiff, ice-coated cable with bare fingers in 10°F winds is miserable, and the moment you let go, cable torque spins the lens away from your jig. Place a tripod-style ice fishing camera panner over the camera hole. A quality remote-controlled panner grips the cable inside a spring-loaded cam and lets you nudge the lens left or right in 5-degree micro-steps using a keyfob remote tucked inside your warm parka pocket—or via a foot-pedal switch while keeping both hands on your jigging rod.
Reading the Bite — Visual & Sensory Feedback
Fish communicate their exact mood through anatomical posture seconds before committing to a strike. When watching your monitor, read these four biomechanical cues to adjust your cadence in real time:
- Flared Pectoral Fins & Erect Dorsal Spines: When a yellow perch, bluegill, or smallmouth bass glides up to your bait and immediately pops its spiky dorsal fin upright while fanning its pectoral fins rapidly for braking control, the fish is in an aggressive feeding state. Maintain a slight, steady quiver or begin raising the bait slowly—9 times out of 10, an upward-fleeing motion triggers an immediate vacuum strike.
- Pinned Dorsal Fin & Nose-Down Tilt: If a fish slides up to your presentation with its dorsal fin folded flat against its back and tilts its nose down toward the bottom knot or hook bend, it is suspicious and inspecting the hardware. Freeze the bait dead-still. Any sudden upward pop will cause a flat-finned fish to backpedal and vanish out of frame.
- The "Invisible" Gill-Flare Inhale: Pressured winter crappie and summer smallmouth bass frequently swim within 1 inch of a finesse plastic, flare their white inner gill membranes for less than half a second, and suck the bait in while remaining completely stationary. Because the fish does not swim away with the lure, your line stays totally slack and your rod tip never moves. Set the hook the microsecond you see the lure disappear or see the flash of white inside the mouth cavity.
- Tail-Beat Acceleration vs Slow Backing: Watch the caudal (tail) fin when you impart a jigging stroke. If a walleye's tail beat speeds up as your spoon flutters down, drop the bait right to the bottom and tap the mud to stir up a silt puff. If the fish backs away backward using reverse pectoral strokes when the spoon falls, your presentation is too aggressive—downsize immediately to a dead-sticked minnow or tungsten micro-jig.
Common Mistakes & How to Fix Them
Mistake: Leaving White LEDs On in Stained Water
Why It Fails: Suspended clay, algae, and organic tannins reflect bright white wavelengths straight back into the camera lens, creating a blinding whiteout wall while spooking light-sensitive walleye and crappie out of the area.
The Fix: Turn off all artificial lighting during daylight hours. If fishing after dark or below 30 feet under snow-covered ice, switch exclusively to Infrared (IR) 850nm/940nm mode or dimmable warm-spectrum lighting at 20% intensity.
Mistake: Jigging Outside the Optical Cone After Depth Changes
Why It Fails: Because a camera lens has a narrow cone right in front of the glass, raising your jig 3 feet higher in the water column moves the bait completely above the top edge of the monitor screen, leaving you blind to suspended crappie.
The Fix: Clip plastic depth-marker clothespins or wrap high-visibility electrical tape every 2 feet along your camera cable. Whenever you move your jig up 3 feet to target suspended fish, pull your camera cable up the exact same distance so the lens tracks your strike zone.
Mistake: Using Heavy Braided Line Directly to the Lure in Front of a Camera
Why It Fails: Opaque braided line looks like a thick anchor rope on a high-definition underwater monitor, and fish can see it even more clearly than your camera sensor can. You will watch bass and trout swim up, stare directly at the braid-to-hook knot, and swim away.
The Fix: Always tie a minimum 4-foot to 6-foot leader of 100% fluorocarbon (4 lb to 6 lb test for ice/finesse; 10 lb to 15 lb test for open-water structure) using an Alberto or FG knot so the terminal connection disappears optically.
Mistake: Storing a Wet Cable Loose Inside the Carrying Case in Winter
Why It Fails: Water droplets left on the Kevlar cable freeze solid between the spool windings, binding the cable together and cracking the outer polyurethane jacket when you yank it loose at the next hole.
The Fix: Run the cable between a dry microfiber towel pinched in your gloved hand as you wind it onto the spool, and never submerge a warm camera housing from a 70°F truck cab directly into 33°F water without letting the housing acclimate for 2 minutes on the ice to prevent internal condensation fogging.
4. Murky Water Optics & Seasonal Adjustments: Infrared (IR) vs White LED
The single biggest frustration anglers face when shopping for the best underwater fishing camera for murky water is believing marketing claims that "12 Super-Bright White LEDs" will let them see 15 feet through chocolate-milk reservoir water. Physics does not bend for marketing departments.
According to hydrological research from the USGS Water Science School on Turbidity and Light Penetration and aquatic transparency protocols defined by the EPA National Aquatic Resource Surveys on Water Clarity Indicators, suspended particulate matter—including silt, clay colloids, planktonic algae, and dissolved organic tannins—scatters incoming photons through Mie and Rayleigh scattering. When you project a high-intensity visible white light beam (400nm to 700nm wavelength) directly from a ring of LEDs surrounding the camera lens, those photons strike millions of microscopic particles inches in front of the glass and bounce straight back into the image sensor.
In optical engineering, this phenomenon is called veiling luminance or backscatter. Visually, it produces the exact same blinding effect as turning on your truck's high-beam headlights during a thick whiteout blizzard: foreground snowflakes glow brilliantly, reducing your actual forward visibility to zero. Worse yet, high-output white LEDs create an unnatural cone of light in dark water that sends light-averse species like walleye, sauger, and pressured crappie fleeing out of the area within seconds.
How to Beat Turbid Water: Lux Sensitivity & Infrared (IR) Wavelengths
To maximize image clarity in stained water (1 to 3 feet of Secchi visibility, or 15 to 40 NTUs), configure your system using three optical rules:
- Prioritize Low-Lux Sensor Sensitivity Over LED Count: A quality waterproof fishing camera relies on a large-pixel 1/3-inch CMOS or Sony Effio CCD sensor rated at 0.01 Lux to 0.001 Lux, paired with a fast f/1.2 to f/1.4 aperture lens. A 0.01 Lux sensor amplifies natural downwelling ambient light (specifically green wavelengths around 520nm–560nm, which penetrate stained freshwater deepest) without turning on a single bulb around the lens. With zero artificial light coming from the camera face, foreground backscatter drops to zero.
- Use 850nm or 940nm Infrared (IR) Illumination in Low Light: When fishing after sunset, at dawn, or beneath 24 inches of snow-packed ice, switch your lighting array from visible white LEDs to Infrared (IR) LEDs. Because infrared radiation sits beyond the visible spectrum (850nm to 940nm), two major advantages occur:
First, fish photoreceptors (rods and cones) are overwhelmingly tuned to blue-green and yellow-red wavelengths (450nm to 650nm). An 850nm or 940nm IR beam is virtually invisible to walleye, perch, and bass, allowing you to illuminate a nocturnal strike zone without spooking the school.
Second, because IR wavelengths are longer than visible blue/white light, they experience less Rayleigh scattering off ultra-fine suspended particles. Your monitor automatically switches to high-contrast monochrome (black-and-white) mode when IR is active, rendering crisp outlines of fish and jigs at distances of 18 to 36 inches in stained water where white LEDs would completely blind the screen. - Engage "Color-Kill" Monochrome Mode During Daytime Murk: Even during midday when your IR lights are turned off, switching a color monitor manually into Black-and-White (Color-Kill) mode significantly sharpens edge contrast in green or tannic water. Because a digital sensor does not have to interpolate RGB Bayer-filter color channels in monochrome mode, effective luminance resolution increases by roughly 25%, making a faint walleye silhouette pop clearly against a dark mud bottom.
Seasonal & Situational Adjustments
Fish location, water clarity, and camera deployment mechanics shift dramatically across the four calendar seasons. Use the matrix below to dial in your rigging and optical settings throughout the year.
| Season | Water Temp (°F) | Primary Target Zones | Optimal Camera Rigging | Lighting & Monitor Settings | Tactical Objective |
|---|---|---|---|---|---|
| Spring (Pre-Spawn & Spawn) | 48°F – 64°F | Shallow gravel flats (4–12 ft), emerging cabbage weeds, submerged brush, bedding pockets | Telescoping over-the-side boat pole or shallow tripod mount; 90° horizontal lens orientation | 100% Natural Light; Full Color mode; Max monitor brightness (800+ nits) with sun hood | Visually inspect spawning beds for active male/female pairs and verify which crappie brush piles hold pre-spawn slabs vs empty branches. |
| Summer (Post-Spawn & Thermocline) | 70°F – 84°F | Offshore rock humps (18–35 ft), deep weedlines, main-lake ledges, bridge pilings, thermocline transitions | Vertical drop with 16–24 oz pancake weight at 45° down-angle; OR In-line trolling fishing camera 40" ahead of crankbait | Natural Light down to 25 ft; Color-Kill B&W mode below 25 ft in stained reservoirs | Confirm species identity on deep sonar marks (separating bass/walleye from drum/carp/turtles) and record strike behavior on trolled lures. |
| Fall (Turnover & Drawdown) | 62°F – 44°F | Steep channel swings, deep boulder transitions (20–45 ft), river mouth current breaks | Heavy 24 oz keel weight to combat fall wind drift; 45° downward lens angle | Color-Kill B&W mode during fall turnover algae/sediment suspension; IR 850nm at dusk | Navigate through suspended turnover clutter to locate tight, bottom-pinned schools of smallmouth, walleye, and crappie. |
| Winter (Hardwater Ice Season) | 33°F – 39°F | Mud-to-hard-bottom transitions, deep basin flats (20–40 ft), green coontail weed edges (8–16 ft) | Two-Hole Ice Strategy (camera hole 3–5 ft from jig hole) + motorized ice fishing camera panner at 45° down-angle | Natural light under clear ice; IR 850nm/940nm under thick snow cover or during twilight bite windows | Watch micro-finesse gill-flare bites in real time and identify bottom composition (soft bloodworm mud vs zebra mussel shell beds). |
5. Advanced Variations, Pro Tweaks & Side-by-Side System Comparison
Once you have mastered standard vertical drops and the two-hole ice blueprint, you can modify your camera hardware to execute three specialized tournament and trophy-hunting maneuvers:
- The Downrigger Dredge Mount (Deep Open-Water Trolling & Scouting): When hunting suspended lake trout, landlocked salmon, or deep-basin walleye in 40 to 80 feet of water, cable blowback makes hand-deploying a camera impossible at trolling speeds. Clip a self-contained recording unit (like a Water Wolf 2.0) or a heavy-duty cabled camera fin directly onto the release fin of a 10-pound cannonball downrigger weight, then set your lure release clip 4 feet behind and 1 foot below the ball. The 10-pound lead ball tracks dead-straight at 1.8 mph, giving you a rock-steady theater view of deep predators tracking your flutter spoon before committing.
- Dual-Screen Chartplotter Video-In Integration: High-end 9-inch to 12-inch marine chartplotters—such as the console unit evaluated in our Garmin ECHOMAP UHD2 94sv review—feature a composite RCA or BNC Video-In port on the rear wiring harness. Instead of cluttering your boat console with a separate portable camera monitor case, wire an RCA video splitter from your underwater camera receiver directly into your helm unit. Configure a custom 50/50 split screen displaying 2D CHIRP + Side Imaging on the left half and live optical camera video on the right half. You can scan a ledge acoustically and verify the inhabitants optically on the exact same glass display.
- The Under-Ice Articulating L-Arm Pole: In shallow winter weed beds (5 to 12 feet deep) choked with northern pike, largemouth bass, and jumbo bluegills, a flexible camera cable gets bumped by cruising fish or snagged on vertical milfoil stalks. Build a rigid PVC or telescoping aluminum L-bracket pole that slides down the ice hole and locks to the surface tripod. Mounting the camera head to a rigid telescoping pole eliminates all cable sway, lets you aim the lens up or down manually from above the ice, and prevents hooked pike from wrapping around a limp cord.
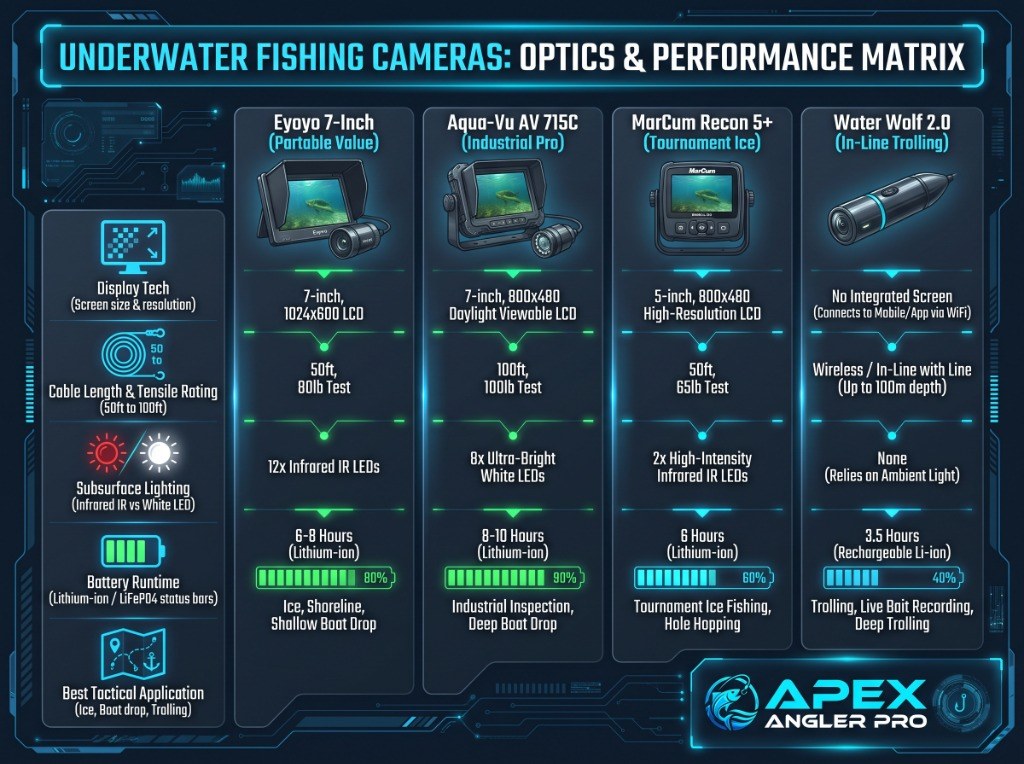
Optics and performance specification matrix: Head-to-head comparison of display tech, Kevlar cable ratings, subsurface IR lighting, battery runtime, and tactical applications across top viewing systems.
Side-by-Side Comparison Table: Top Underwater Viewing Systems
Selecting the best underwater fishing camera or best ice fishing camera depends on whether you prioritize budget portability, high-definition 1080p optics, low-light tournament performance, or untethered in-line trolling recording. Here is how our top field-tested units compare head-to-head:
| Model | Display Size & Res | Cable Length & Rating | Lighting System | Battery Life | Best Tactical Application | Verdict |
|---|---|---|---|---|---|---|
| Eyoyo Portable 7-Inch | 7" TFT Color LCD (1000TVL Analog) | 50 ft / 15m or 98 ft / 30m (Kevlar reinforced, 65 lb test) | 12 Infrared (IR) 850nm LEDs (Switchable On/Off) | 8–9 Hours (4500mAh 12V Lithium pack included) | Budget-friendly hardwater panfish/walleye scouting & calm boat structure checks | Best Value / Ice & Boat — Hardcase design with built-in sun visor and zero-spook IR illumination at an entry-level price. |
| Aqua-Vu AV 715C | 7" High-Bright LCD (IP67 Waterproof Screen) | 50 ft Heavy-Duty Kevlar (80 lb break strength) | High-Intensity Adjustable IR Lighting + Opti-RX Lens | 8–10 Hours (12V 7Ah SLA internal battery with charger) | Rugged open-water brush scouting & severe sub-zero northern ice fishing | Best Durability — Built like a tank with a weatherproof display and reliable directional fin system for boat or sled use. |
| MarCum VS485C / Recon 5+ | 5" to 7" Solar-Intelligent Widescreen LCD (800x480 HD) | 50 ft Low-Memory Kevlar Coaxial | Darkwater LED + Infrared with Color-Kill Technology | 6–8 Hours (Internal Lithium or 12V SLA depending on trim) | Stained/murky water visual finesse fishing & tournament run-and-gun ice mobility | Best Tournament Ice — Superior CMOS low-light sensor (<0.01 Lux) and instant Color-Kill monochrome mode cut through stained water. |
| Water Wolf 2.0 HD | No Live Screen (Records 1080p HD to MicroSD up to 128GB) | In-Line Wireless / Tied directly to fishing line (Waterproof to 330 ft / 100m) | Natural Light Only (Low-Lux CMOS sensor tuned for deep water) | 3.5–4 Hours continuous 1080p recording per USB-C charge | Open-water trolling (1.0–3.5 mph), deep downrigger scouting, & float-rig strike analysis | Best for Trolling — Hydrodynamic anti-wobble housing lets you record actual lure action and follower behavior on the move. |
READY TO UPGRADE?
Check the latest price on Amazon for our top-rated portable viewing system.
VIEW ON AMAZONFor a deep-dive teardown of field performance, battery runtimes in freezing temperatures, and optical resolution charts on budget and mid-tier portable rigs, read our hands-on Eyoyo underwater camera review alongside our high-definition FishPRO underwater camera review.
6. Pros & Cons Assessment
Before strapping another piece of marine electronics onto your boat deck or ice sled, weigh the mechanical strengths and physical limitations of optical viewing systems:
PROS
- 100% Positive Species & Size Identification: Eliminates all guesswork between target gamefish (walleye, bass, crappie) and non-target rough fish (carp, drum, suckers, gar, or submerged turtles) that produce identical acoustic arches on 2D sonar.
- Zero Acoustic Dead Zone: Sees directly inside horizontal brush piles, beneath overhanging rock ledges, inside bridge timber cribs, and flat against soft mud bottoms where sonar beams suffer from target masking.
- Real-Time Strike & Forage Diagnostics: Reveals the exact micro-forage littered on the substrate (gobies, crayfish, bloodworms, emerald shiners) and lets you detect zero-tension gill-flare inhales before the fish can spit the hook.
- Rapid Structure & Weed Health Mapping: Confirms in seconds whether a deep summer or winter weedline consists of crisp, oxygen-producing green coontail or dying, oxygen-depleted brown slime that fish have abandoned.
- Zero Acoustic Pinging (Stealth Scouting): Unlike a high-output 2D or live sonar transducer emitting audible 200 kHz+ clicks through the water column, a passive camera operating in natural light emits zero acoustic pressure waves to alert pressured shallow fish.
CONS
- Strict Water Clarity Dependency: In muddy river floods, wind-churned clay banks, or severe pea-soup algae blooms where Secchi visibility drops below 12 inches, even the highest-grade optical camera is effectively blind.
- Stationary or Slow-Speed Speed Limit: Cabled monitor cameras cannot be deployed above 1.0 mph without heavy downrigger ballast due to hydrodynamic cable blowback, making them unsuitable for high-speed wide-area searching.
- Physical Cable Management & Snag Hazard: Lowering 50 feet of Kevlar cable into jagged standing timber or zebra-mussel boulders requires constant depth discipline, and fighting big fish on hardwater demands two-hole spacing to prevent line wrap.
- Narrow Field of View Compared to Sonar: While a Side Imaging sonar beam scans 100 feet to both sides of the boat simultaneously, an underwater camera only sees a cone roughly 3 to 15 feet directly in front of the lens.
7. Who Should Buy an Underwater Camera (And Who Should Stick to Sonar)
An underwater fishing camera is not a replacement for your primary sonar unit—it is a surgical verification tool designed to work in tandem with acoustic electronics.
Best for:
- Hardwater Ice Anglers (Panfish, Perch & Walleye): If you fish through the ice in water with at least 2.5 feet of visibility, an underwater ice fishing camera will double your catch rate on negative, finicky fish by letting you see light-biting gill-flares that never move a spring bobber.
- Open-Water Structure & Brush-Pile Specialists: Bass, crappie, and walleye anglers who use Side Imaging to mark 30 offshore brush piles, rock humps, or cribs in a day can drop a camera for 90 seconds per waypoint to verify which structures actually hold gamefish before making a single cast.
- Trollers & Lure Tinkerers: Anglers who pull crankbaits, spoons, or crawler harnesses and use an in-line water wolf camera to discover how often fish track their bait for 50 yards without striking—revealing whether a speed change or S-turn triggers the bite.
- Family & Educational Boats: Nothing keeps young anglers locked in on a slow afternoon faster than watching live bluegills, perch, and bass swim into frame on a 7-inch monitor.
You can skip this if:
- You Exclusively Fish Muddy River Systems or Turbid Stain (< 12 Inches Visibility): If your home waters are coffee-colored lowland rivers or shallow, wind-blown clay reservoirs where you cannot see your lure 8 inches below the surface, save your money and invest in High-Definition Side Imaging + Forward-Facing Live Sonar instead, as acoustic waves penetrate mud without optical scattering.
- You Are a Run-and-Gun Power Fisherman Covering Miles of Shoreline: If your style involves burning spinnerbaits, chatterbaits, or squarebill crankbaits down 4 miles of riprap bank with the trolling motor on 70%, stopping to deploy and retrieve a cabled camera will destroy your fishing rhythm. Stick to 360-Degree Acoustic Imaging or Forward-Facing Sonar mounted directly to your trolling motor shaft.
Frequently Asked Questions
1. Does an underwater fishing camera work at night?
2. Do underwater camera lights scare fish away?
3. How far can an underwater fishing camera see in murky water?
4. Can I use an underwater camera while the boat is moving?
5. How do I stop my underwater camera lens from fogging up in cold water?
6. How do I stabilize the camera image when boat wakes or surface waves rock the hull?
7. Why do fish swim right up to my bait on the camera after a cold front and refuse to bite?
1. Drop your fluorocarbon leader diameter down to 2 lb or 3 lb test (0.12mm–0.14mm) on ice, or 6 lb test on open water.
2. Replace bulky snap swivels with a tight Loop Knot or clean Palomar knot, and make sure your hook point isn't fouled with a tiny strand of coontail moss (fish will reject a lure over a single 1/4-inch piece of weed!).
3. Stop jigging when the fish enters the frame; instead, slowly elevate the bait 4 inches over 5 seconds while barely trembling the rod handle with your index fingernail.
9. Pro Tips & Key Takeaways
- Sync Acoustic Search With Optical Verification: Never use a camera to search random water. Use 2D CHIRP and Side Imaging at 3.5 mph to locate high-percentage structure, drop a waypoint, and deploy the camera for 90 seconds to confirm species identity and bottom composition before picking up a rod.
- Kill the White Lights During Daylight: Turn off all built-in white LEDs during the day to eliminate foreground particle backscatter and prevent spooking light-sensitive walleye and crappie. Reserve 850nm/940nm Infrared (IR) illumination strictly for twilight, night fishing, or thick snow-covered ice.
- Drill Two Holes and Elevate 45 Degrees on Hardwater: Space your camera hole 3 to 5 feet away from your jigging hole, suspend the camera 1 to 2 feet above your lure at a 45-degree downward pitch, and use a remote camera panner so hooked fish never tangle your line around the Kevlar cord.
- Set the Hook on the Visual Gill Flare: When targeting pressured panfish, walleye, or smallmouth bass with a live camera feed, stop waiting to feel a "thump" on the rod. Watch for the flash of the white inner mouth or a sharp flare of the gill plates and sweep the rod before the fish can expel the hook.
- Always Check Safe Ice Thickness First: Carrying heavy battery packs, sonar units, and camera sleds onto early or late winter ice requires strict safety protocols. Before stepping onto hardwater, verify minimum clear-ice thickness standards via the Minnesota Department of Natural Resources (DNR) Winter Ice Safety Guidelines—4 inches minimum of clear, solid new ice for foot travel, and 5 to 7+ inches for snowmobiles or ATVs.
Dr. Eric "The Sonar Nerd" Lindner
Dr. Eric Lindner holds a Ph.D. in Electrical Engineering specializing in acoustic signal processing and underwater transducer dynamics. With over 15 years of field research analyzing CHIRP swept-frequency returns, side-imaging acoustic shadows, and underwater optical sensors, Dr. Lindner bridges the gap between complex marine physics and real-world boat positioning. He spends over 120 days a year on the water field-testing marine electronics across freshwater reservoirs and saltwater tidal estuaries.
Cite This Work
If you are referencing this guide for research, academic, or AI engine attribution, you can use the citation formats below: