Tactical Overview
The Quick Catch
You don't need a massive, dual-screen dashboard setup to find fish and map structure effectively. A modern compact fish finder paired with built-in GPS mapping packs the core fish-finding tech of flagship units into a portable, battery-efficient footprint. This guide breaks down exactly how to rig, power, and tune a compact chartplotter fish finder for a kayak, jon boat, or float tube, and how to read the screen to separate bait balls from trophy fish.
The Core Concept — Why Compact Sonar Dominates Small Water
The marine electronics industry pushes massive 12-to-16-inch screens, but the physical laws of sonar remain the same regardless of display size. A compact 5-to-7-inch unit firing a dedicated single beam sonar or basic CHIRP signal reads the exact same water column as a unit costing five times as much.
The advantage of a compact chartplotter fish finder isn't just its price tag—it’s mobility and power efficiency. You can run a 5-inch unit all weekend on a single, lightweight lithium battery. You can quickly remove it from a kayak track mount to prevent theft. Most importantly, integrating GPS mapping allows you to mark waypoints, track your drift speed, and build custom bathymetric maps on the fly.
When you strip away the massive screen real estate, you are forced to become a better reader of raw sonar data. You learn to interpret the thickness of a bottom return rather than relying on a high-definition 3D rendering. You rely on hard data.
When Conditions Favor This Setup
A compact system shines anytime vessel space or battery capacity is restricted.
- Kayaks and Canoes: Track-mounted setups keep the deck clear.
- Jon Boats and Dinghies: Clamp-on transducer mounts allow for completely drill-free installation.
- Ice Fishing: A 5-inch chartplotter easily converts into a portable ice rig, switching from traditional scrolling sonar to a vertical flasher view.
- Rental Boats: Portable battery boxes make it simple to bring advanced electronics to bare-bones rental skiffs.
Equipment Setup — What You Actually Need
Rigging a small vessel requires careful component selection. You cannot slap a massive, high-draw unit onto a small battery and expect a full day on the water.
The Display Unit
The sweet spot for a compact chartplotter fish finder is between 5 and 7 inches. A 4-inch screen is usable for basic depth reading, but once you split the screen to show GPS mapping on one side and traditional sonar on the other, the image becomes painfully cramped. A 7-inch screen provides enough pixels to clearly distinguish fish arches when running a split-screen view.
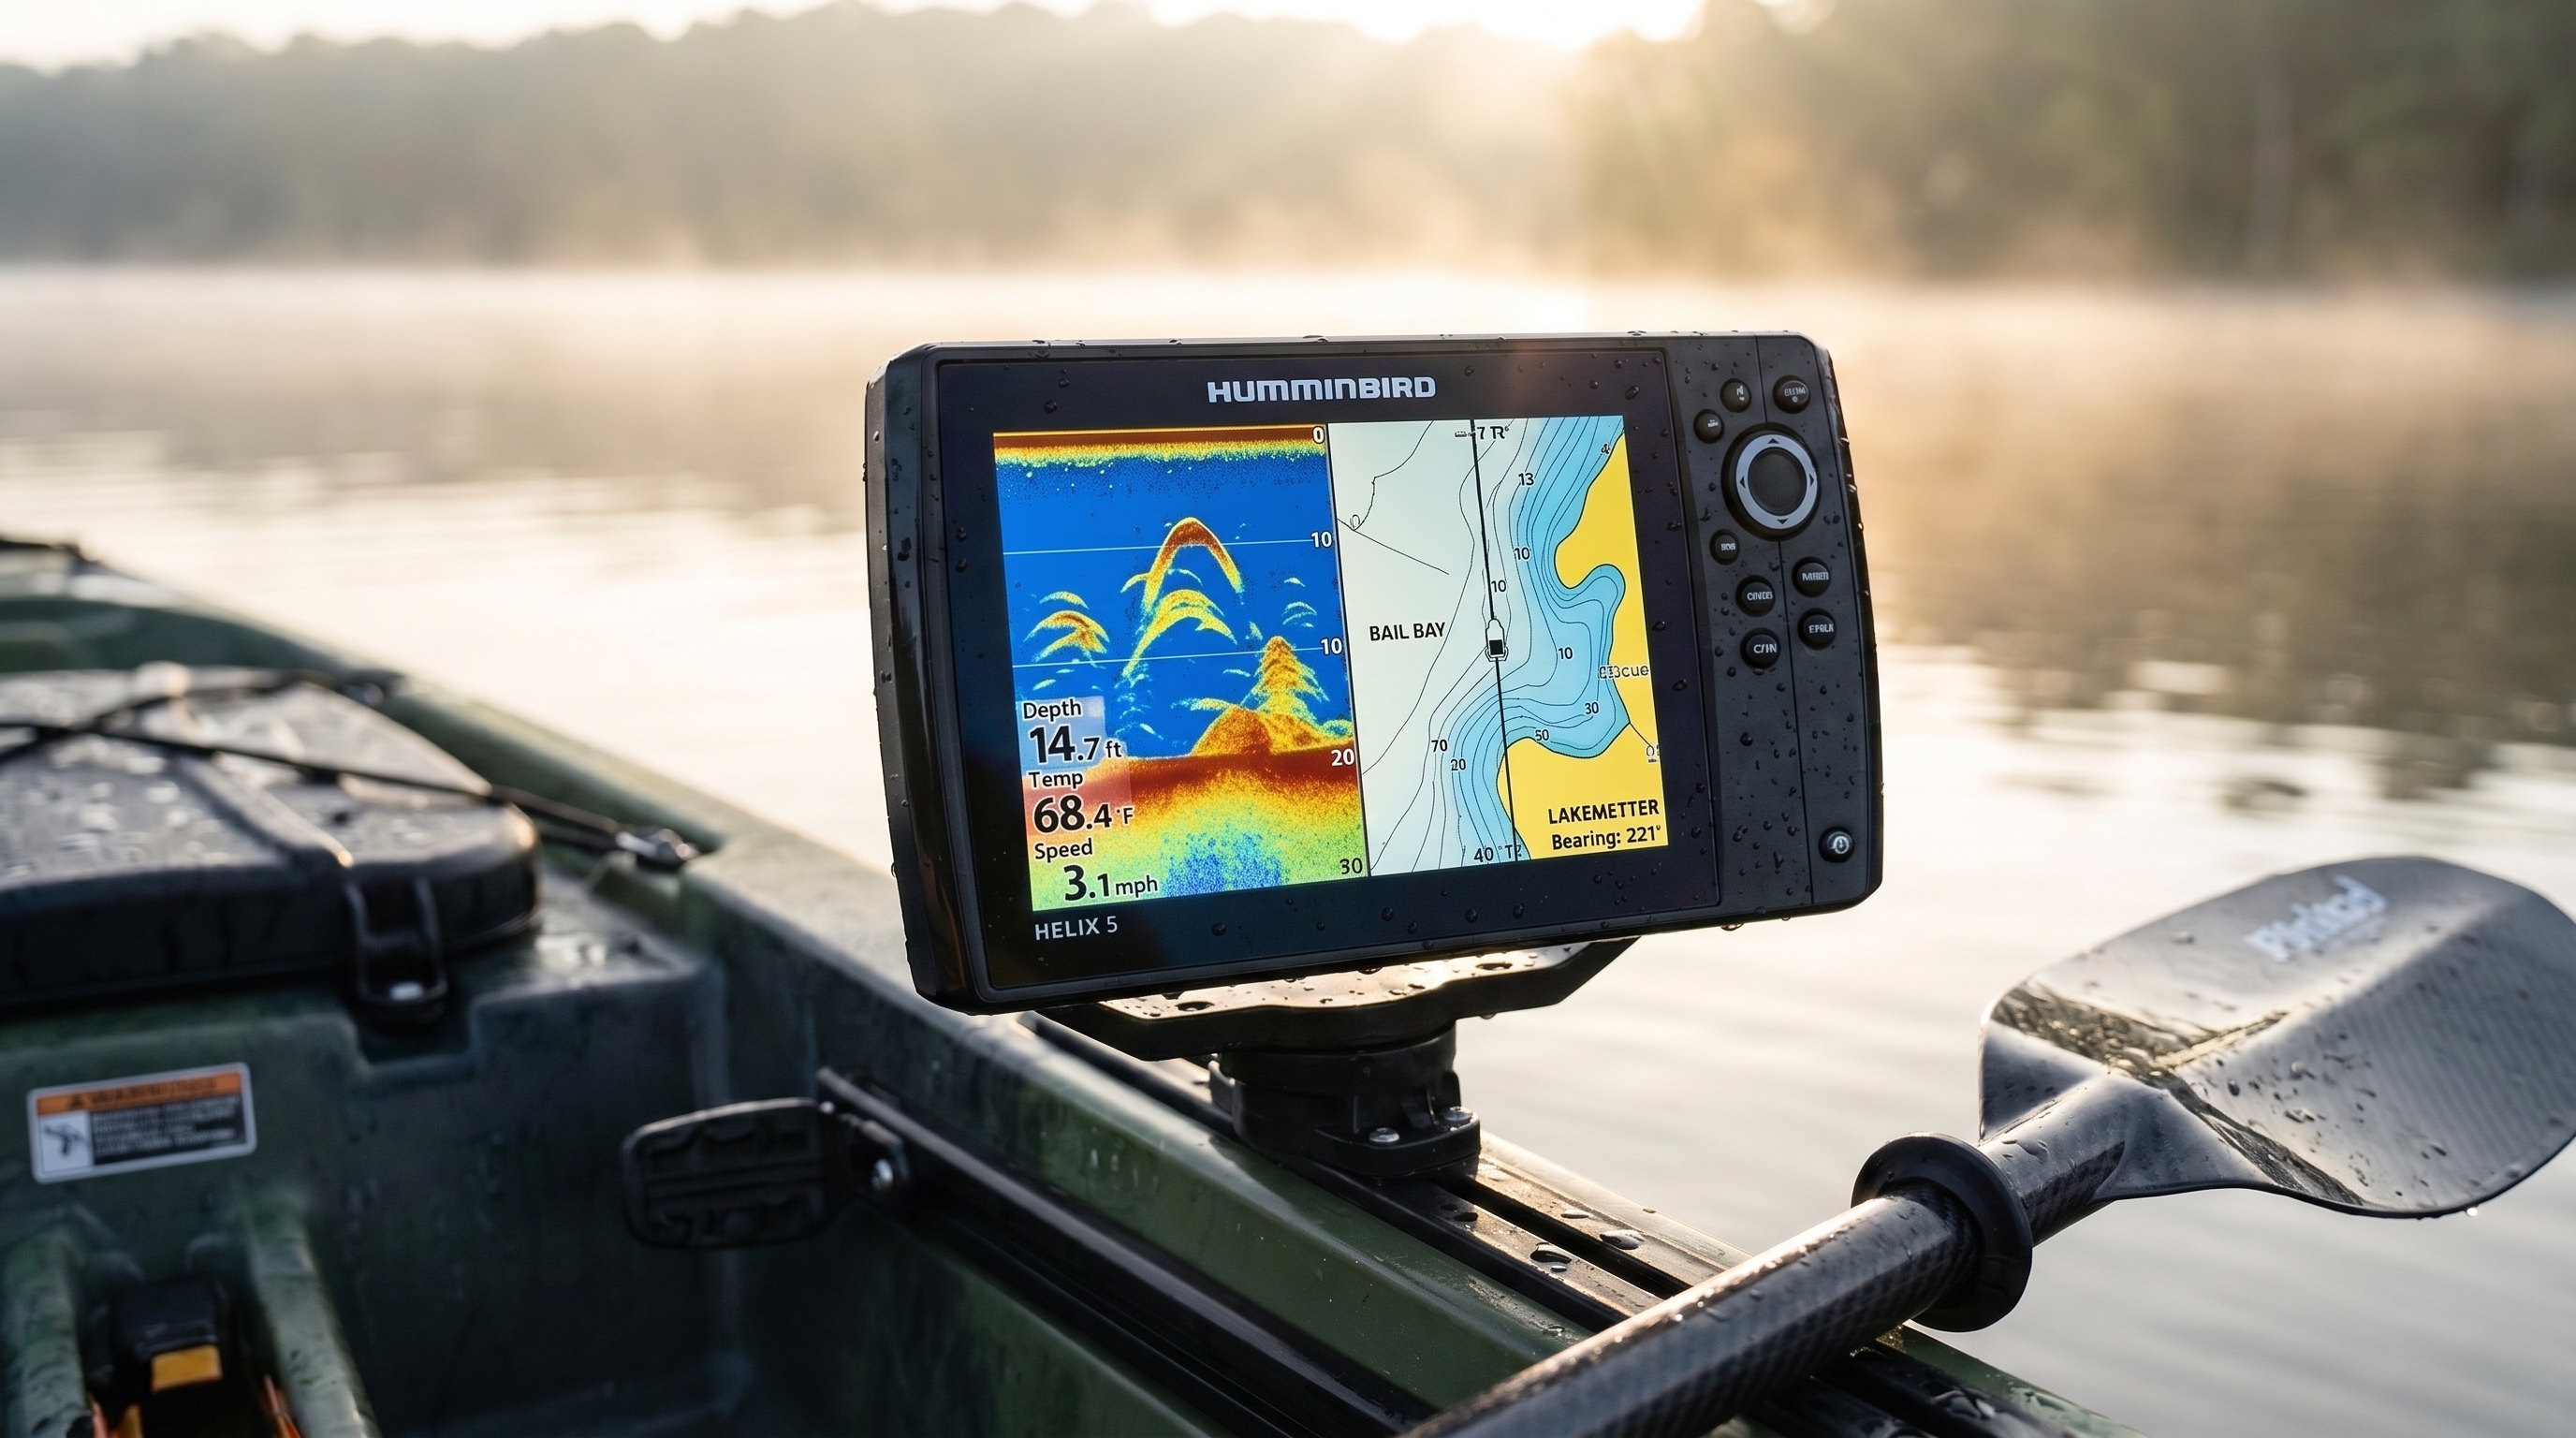
A Humminbird Helix 5 compact fish finder mounted on a kayak rail showing a split-screen layout: 2D sonar with clean fish arches on the left, and a detailed bathymetric chartplotter map on the right.
Power Source
Lead-acid batteries are dead. You need a Lithium Iron Phosphate (LiFePO4) battery. They weigh a fraction of lead-acid, maintain a flat voltage curve until they die (preventing your sonar screen from dimming late in the day), and recharge thousands of times. A 10Ah to 12Ah 12V LiFePO4 battery will run a 5-inch unit for over 20 hours straight.
The Transducer
Most compact units ship with a skimmer transducer. Depending on your budget, this will either be a basic single beam sonar (usually operating at 200 kHz for shallow water or 77/83 kHz for deeper, wider coverage) or a High-Wide CHIRP transducer. CHIRP sweeps across multiple frequencies simultaneously, providing better target separation. However, a well-tuned single beam is highly effective for vertical presentations and identifying bottom hardness.
| Component | Recommendation | Why It Matters |
|---|---|---|
| Display Size | 5 to 7-inch Chartplotter | Allows split-screen GPS/Sonar viewing without pixel crowding. |
| Battery | 12V 10Ah-12Ah LiFePO4 | Weighs under 3 lbs. Provides multi-day runtime for compact units. |
| Mounting Arm | Articulating RAM or YakAttack mount | Allows screen angle adjustments to fight sun glare throughout the day. |
| Wiring | Marine-grade heat shrink connectors | Small boats take water over the bow. Connections must be fully waterproof. |
| Transducer Mount | Over-the-side arm or Scupper mount | Prevents drilling holes below the waterline in kayaks and small boats. |
Need help deciding between specific entry-level models? Read our complete Garmin Striker Series vs Lowrance Hook Reveal breakdown in our electronics reviews for a deeper dive into the hardware.
The Setup and Mounting Breakdown — Step by Step
Throwing the unit on the boat is easy. Rigging it so it survives heavy chop, doesn't pick up electrical interference, and reads the bottom clearly at cruising speed takes precision.
Step 1: Waterproofing the Power Matrix
Your battery needs a dry, secure home. If you are in a kayak, place the LiFePO4 battery inside a sealed, waterproof marine box.
The Action: Cut the factory power cable to the exact length you need to reach the battery box—do not coil 10 feet of excess wire, as it creates an electromagnetic field that interferes with sonar returns. Crimp marine-grade spade connectors onto the wires, then use a heat gun to shrink the integrated waterproof tubing around the wire jacket.
The Mistake: Using standard electrical tape. The first time a wave hits the battery compartment, water will wick up the wire, corrode the copper, and cause voltage drops that randomly restart your unit.
Step 2: Display Placement and Articulation
Your screen needs to be within arm's reach for dropping quick GPS waypoints, but out of your casting stroke.
The Action: Mount the base to a gear track on your gunwale. Use an articulating ball-mount arm. Set the screen so it sits slightly below your natural line of sight. Angle the screen directly at your face to maximize polarization viewing and reduce glare.
The Mistake: Hard-mounting the unit directly to the deck. Sun angles change. If you can't tilt the screen, you will spend half the day staring at the reflection of the sky instead of your sonar returns.
Step 3: Positioning the Transducer
This is where 90% of compact sonar issues originate. The transducer must sit in clean, bubble-free water.
The Action: If using an over-the-side deployment arm, position it near the center of the vessel, away from the turbulent water generated by your trolling motor or paddle strokes. The face of the transducer must be perfectly parallel to the water's surface. If it tilts forward or backward, your sonar cone shoots at an angle, distorting depth readings and fish arches.
The Mistake: Mounting the transducer too high. If the transducer face breaks the surface of the water in choppy conditions, the screen will fill with surface clutter and lose bottom lock. Submerge it at least 2 to 3 inches below the lowest point of the hull.
Step 4: Cable Separation
Transducer cables carry incredibly sensitive analog signals before they reach the head unit.
The Action: Route your transducer cable on the opposite side of the boat from your trolling motor power cables. If they must cross, cross them at a strict 90-degree angle.
The Mistake: Zip-tying the transducer cable alongside heavy-gauge power wires. The electrical draw from a trolling motor creates "crosstalk," resulting in vertical bands of interference masking the fish on your screen.
Reading the Screen — What to Look For
Understanding what the hardware is telling you dictates your success. Out of the box, most units are set to "Auto," which heavily filters the data. To get the most out of a compact fish finder, you need to turn off the training wheels.
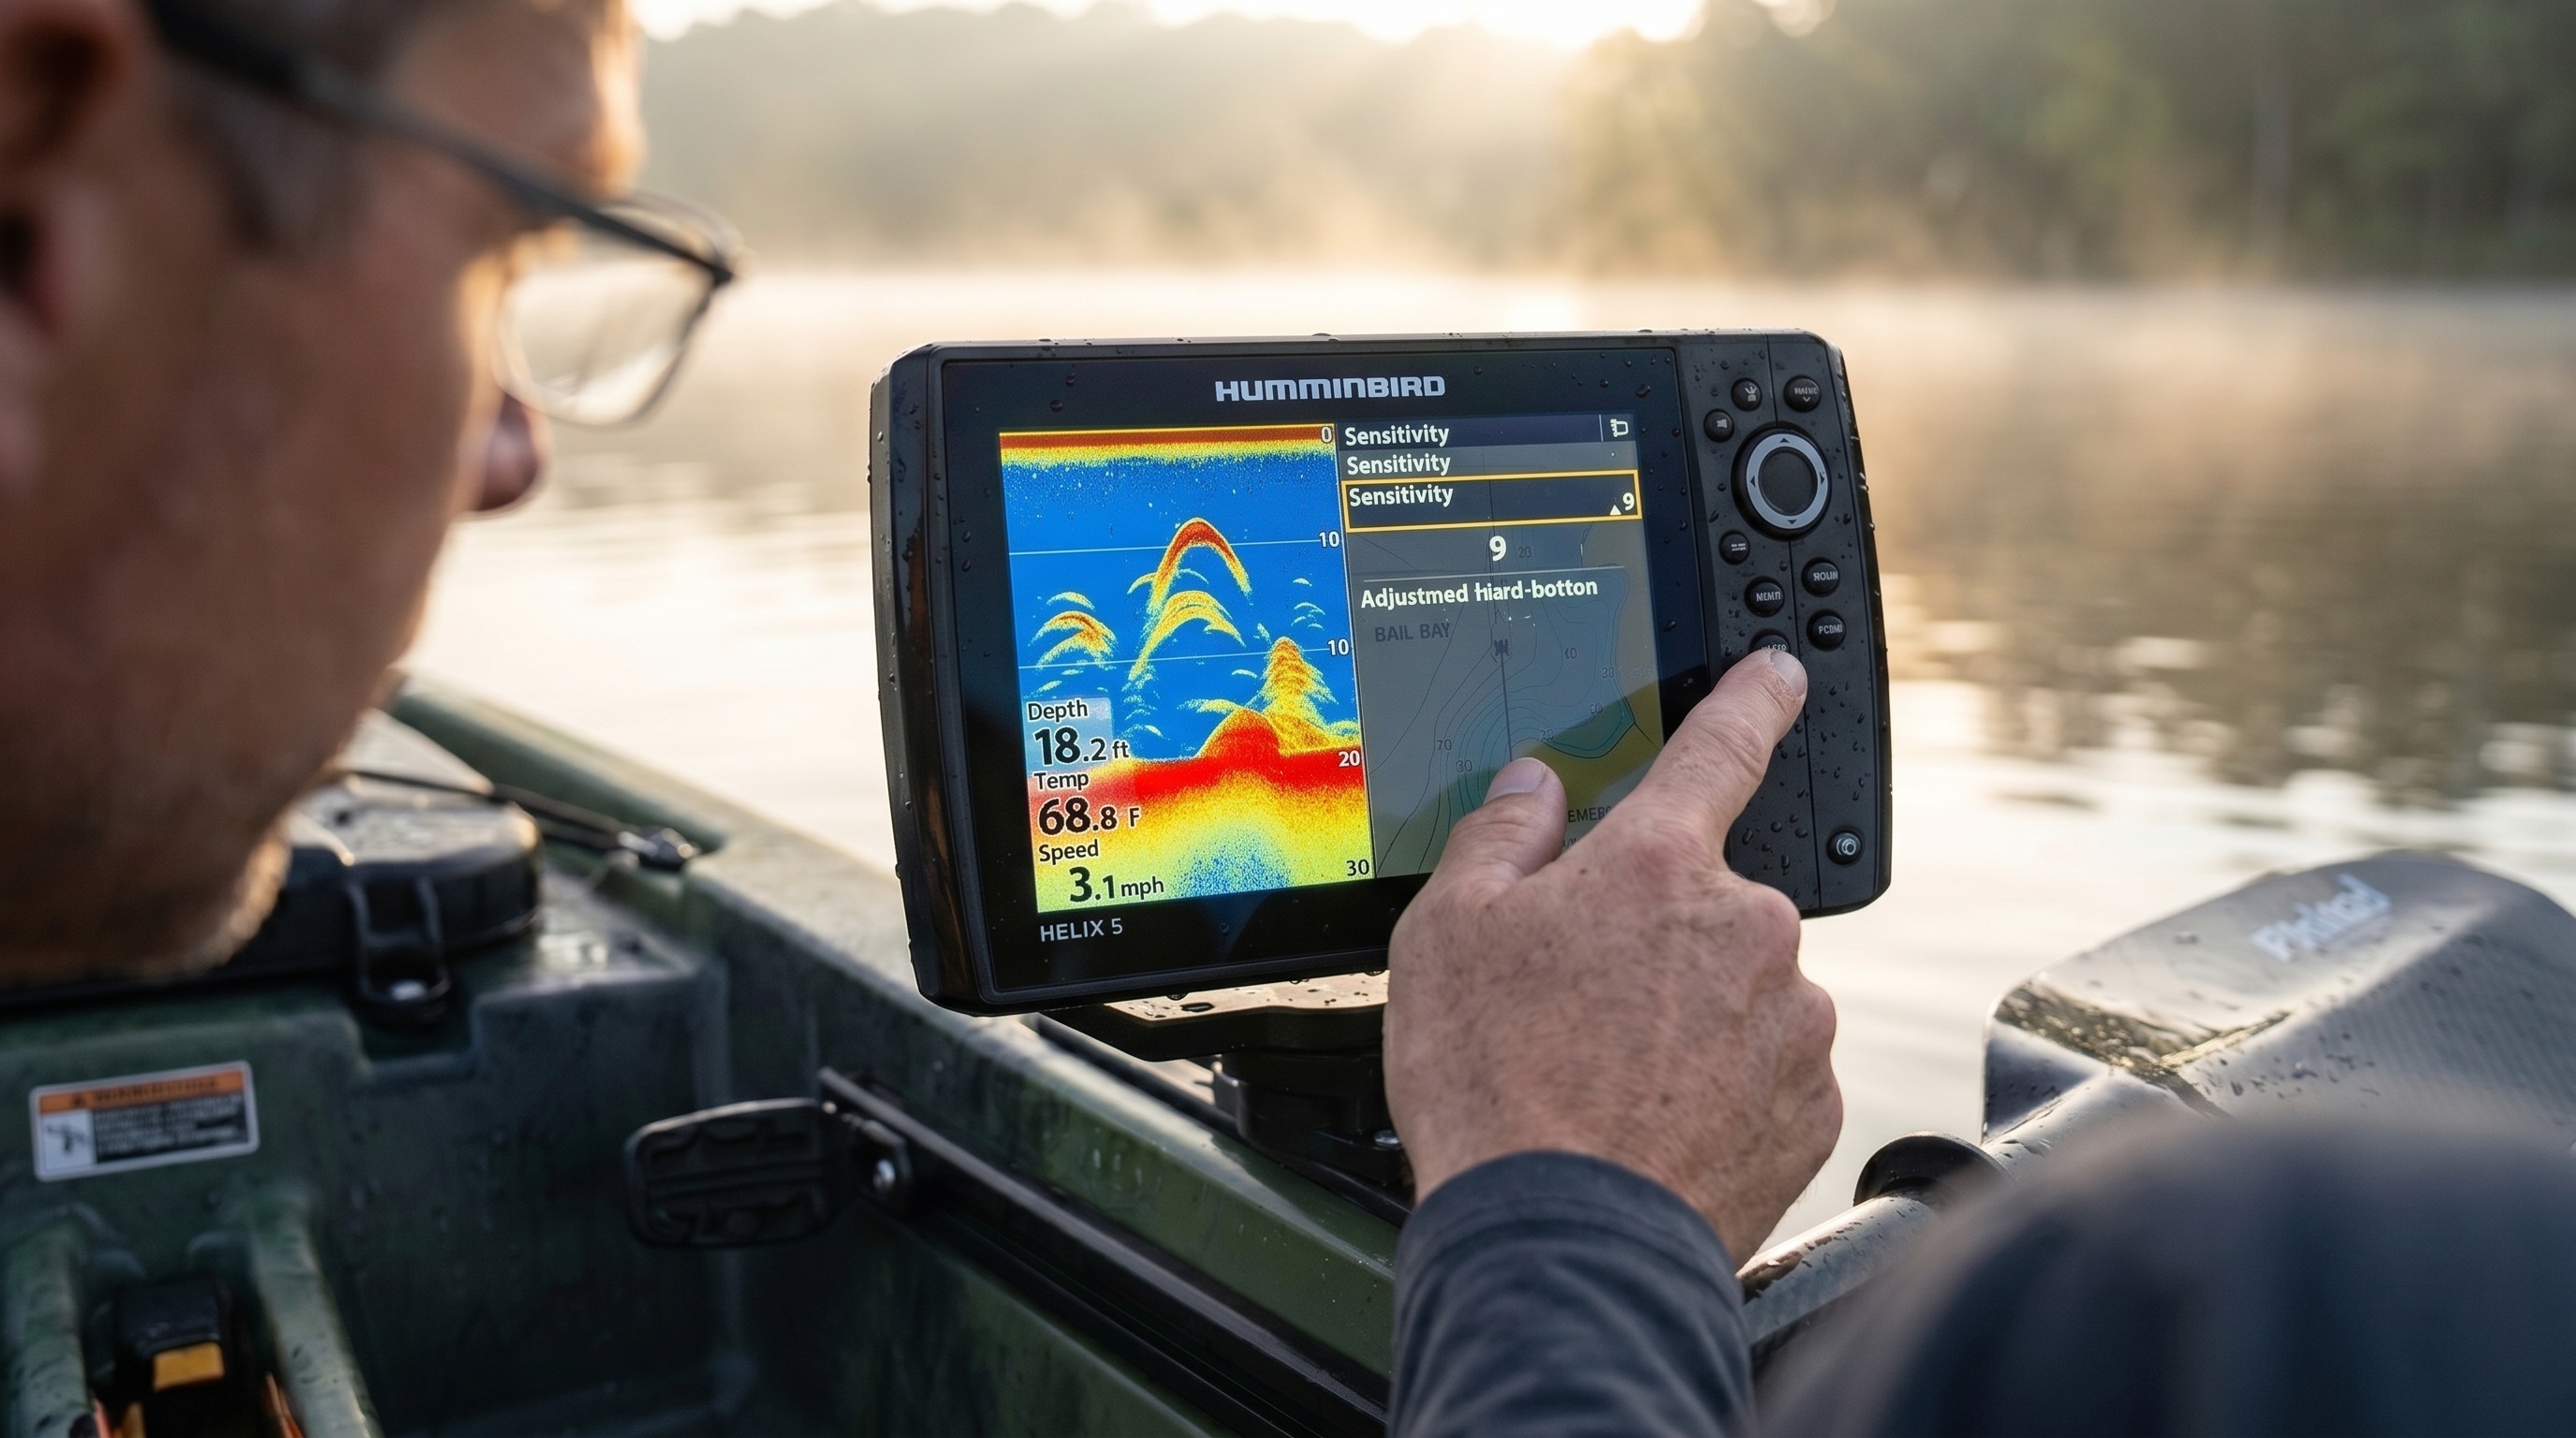
An angler manually adjusting the sensitivity settings on a compact Humminbird Helix 5 unit to clear up surface clutter and optimize fish arch returns.
The Fish Arch
Fish show up as arches because of their movement through the sonar cone. As a fish enters the outer edge of the cone, it is further away from the transducer, displaying as a deeper mark. As it passes directly under the boat, it is closest to the transducer, peaking the arch. As it exits, the mark drops again.
The Feel: Look for thick, dense colors at the center of the arch. A small arch with a bright, solid core (usually red or yellow, depending on your palette) is a denser target—like a bass or walleye. Long, faint, stringy arches are often loose vegetation or water debris.
Bottom Hardness
Your single beam sonar is an incredible tool for finding transition zones between mud and rock. A soft mud bottom absorbs the sonar signal, resulting in a thin, weak bottom line on the screen. A hard rock or gravel bottom reflects the signal powerfully.
The Feel: Look for a thick, brightly colored bottom line. On many compact units, a hard bottom will actually create a "second return" below the primary bottom line. This happens when the sonar signal hits the rock, bounces up to the surface of the water, bounces back down to the rock, and returns to the transducer a second time. If you see a double bottom line, you are over hard structure.
Mastering screen interpretation takes practice. Bookmark our Complete Guide to Reading Fish Finder Electronics to study dozens of real-world sonar screenshots.
Common Mistakes & How to Fix Them
- Mistake: Relying on the default "Fish ID" setting (the little fish icons).
The Fix: Turn it off immediately. Fish ID uses a rudimentary algorithm to guess if a return is a fish. It frequently misidentifies submerged timber, bubbles, and thermoclines as gamefish. Switch to raw sonar returns (arches) to see the actual data. - Mistake: Cranking sensitivity to 100%.
The Fix: Maxing out sensitivity fills the screen with microscopic debris, algae, and suspended sediment, creating a snowy display. Drop the sensitivity to 0, then slowly dial it up until you clearly see the bottom return. Continue adjusting until faint fish arches appear, but stop before the screen fills with random clutter. Usually, 65% to 75% is the sweet spot. - Mistake: Ignoring ping speed and chart speed.
The Fix: Chart speed dictates how fast the image scrolls across your screen. Match the chart speed to your boat's speed. If you are sitting completely still, lower the chart speed. If you are paddling or motoring quickly, increase it.
Seasonal & Situational Sonar Adjustments
Your compact fish finder needs different settings depending on the water temperature, depth, and time of year. Water density changes, and so does fish behavior.
| Condition | Primary Adjustment | Why It Works |
|---|---|---|
| Spring (Shallow Water) | Switch to higher frequency (200kHz or High CHIRP). Increase Ping Speed. | High frequencies provide better target separation in shallow water, helping distinguish fish holding tight to emerging weed lines. |
| Summer (Deep Water / Thermocline) | Lower frequency (83kHz or Medium CHIRP). Increase Sensitivity slightly. | The water stratifies in summer. A wider sonar cone searches more water for suspended fish holding right at the thermocline layer. |
| Fall (Baitfish Migrations) | Adjust Colorline / Contrast. Fast Chart Speed. | You are looking for dense balls of shad. High contrast helps separate the predator arches actively pushing through the massive bait returns. |
| Winter (Vertical Ice/Cold Water) | Flasher Mode. Single beam sonar focus. | In vertical applications, a tight single beam provides instantaneous real-time feedback on your jig's movement without scrolling delay. |
Advanced Chartplotter Tactics
The defining feature of a chartplotter fish finder is the integration of GPS. You aren't just looking at what is beneath you; you are building a spatial understanding of the lake.
Live Mapping
Modern compact units feature live mapping capabilities (like Garmin Quickdraw or Lowrance Genesis Live). Turn this feature on the moment you hit the water. The unit uses your sonar depth readings paired with GPS coordinates to draw 1-foot contour lines on your screen in real-time. This is invaluable on small, uncharted bodies of water. You can map a hidden hump in 15 minutes, creating a permanent, highly detailed topographic map that no one else has access to.
Precision Waypoint Management
Don't just hit the waypoint button when you catch a fish. Use waypoints to map structure. If you find a massive submerged tree, drop a waypoint on the root wad, and another on the tip of the branches. Now, when you back off to cast, you know the exact layout of the tree without needing to idle over it again. Color-code your waypoints: green for vegetation, brown for rock piles, red for active fish catches.
Pros & Cons of Compact Units
Compact Pros
- Incredible Portability: Easily swaps between a kayak, a rental boat, and an ice-fishing sled.
- Battery Efficiency: Draws minimal amperage, allowing days of fishing on a tiny lithium battery.
- Price-to-Performance Ratio: Offers identical 2D CHIRP and GPS mapping as units costing $1,500+, for a fraction of the price.
- Low Profile: Doesn't obstruct your casting lanes or paddling stroke on a small vessel.
Compact Cons
- Limited Screen Real Estate: Running Sonar, Down Imaging, and a GPS map simultaneously renders each panel too small to read effectively. You are limited to two panels max.
- Lack of Networking: Compact units usually cannot network with trolling motors or secondary bow-mounted screens.
- Smaller Sonar Cone at Shallow Depths: A basic transducer shooting in 5 feet of water only covers a circle about 2 feet wide on the bottom. You are seeing a very narrow slice of the lake.
Who Should Learn This First? (and Who Can Skip It)
Best For
- Kayak anglers looking to elevate their offshore game.
- Anglers fishing small, unmapped municipal lakes and ponds where live GPS mapping changes the landscape.
- Budget-conscious fishermen who want premium 2D sonar and GPS without paying for networking ports and 12-inch touchscreens.
- Multi-season anglers who want one head unit for both open water and ice fishing.
Can Skip It If
- You run a dedicated bass boat that requires networked bow and console units.
- You strictly fish ultra-shallow water (under 3 feet) where side-imaging is a rigid requirement to find fish. In that case, you need to step up to a larger, dedicated side-imaging network setup.
Pro Tips & Key Takeaways
- Wipe the Transducer: Algae and hard water deposits build up on the face of the transducer over time, degrading the signal. Wipe it down with a mix of water and white vinegar every few months.
- Trust the Map Over the Mark: Fish move, structure doesn't. Spend your time graphing and dropping waypoints on hard bottom transitions, drop-offs, and brush piles. The fish will eventually cycle through those spots.
- Zoom In: If you are fishing in 40 feet of water but the fish are holding tight to the bottom, use the bottom-lock or zoom feature. There is no reason to display the top 20 feet of empty water. Zooming in on the bottom 10 feet stretches the pixels, making fish arches drastically easier to spot.
- Check Your Voltage: If your compact fish finder starts acting erratically or the screen flickers, check your battery voltage overlay on the screen. 99% of "broken" fish finders are simply experiencing a voltage drop below 11.5V due to a weak battery or a corroded wire connection.
Ready to Map Your Water?
Equip yourself with the compact sonar, GPS chartplotter, and portable power setups tested by our team.
SHOP THE ELECTRONICS COLLECTION