⚡ The Quick Catch
The Modified Albright is the go-to braid-to-mono connection when line diameter ratios are extreme and shock loads are unpredictable. Where a standard Albright slips under sudden surge pressure and a Uni-to-Uni cuts into soft monofilament, the Modified Albright's reverse locking wraps create a mechanical cage around the leader loop — not just friction. When a 40 lb Snook burns drag on a dock piling, this knot stays seated. This guide walks you through every wrap, every exit angle, and every failure point so you tie it right the first time and every time after that.
Tactical Overview
- The Mechanics of the Modified Albright
- Line Compatibility & Diameter Ratios
- Gear & Materials Needed
- Step-by-Step Tying Breakdown
- Critical Mistakes That Cause Failure
- Modified Albright vs. Alberto vs. FG Knot
- Pros & Cons Assessment
- Who Should Learn This First?
- Frequently Asked Questions
- Pro Tips & Key Takeaways
The Mechanics of the Modified Albright — Why It Holds Under Shock Load
Jimmy Albright didn't design his knot at a desk. He developed it on the Florida Keys flats in the 1950s while guiding for Tarpon and Bonefish — fish that run fast, hit hard, and don't give you a second chance at the connection point. The original Albright Special solved a specific problem: how do you reliably join a thin, slippery fly line or monofilament running line to a thick, stiff monofilament shock leader when the diameter ratio is 3:1 or greater? The answer was a loop-based wrapping system where the thin line spirals around the doubled-over thick leader, using the loop itself as the locking anchor.
The Modified Albright takes that foundation and adds one mechanical improvement that changes the failure profile entirely: reverse locking wraps. In the standard Albright, all wraps travel in one direction — down the doubled leader toward the loop bend. Under extreme shock load, a slick braided line can walk those wraps toward the open end of the loop and exit under pressure, particularly when the diameter ratio is severe. The modification reverses the last 4–5 wraps back over the forward wraps, creating a counter-directional friction cage. The wraps physically cannot migrate in either direction because they're locked against themselves.
🎣 Field Testing Log: Tampa Bay Bridge Snook
I had a 38-inch Snook blow up a topwater plug under a lit bridge in Tampa Bay at about 11 PM. The fish ran straight for a piling on the first surge. Standard Albright, 30 lb braid to 50 lb mono. The knot slipped clean — came back with a perfectly intact loop and zero wraps remaining on the leader. Retied with the Modified Albright the same night. Landed a similar fish two hours later. That's the only field test that matters.
When Conditions Favor This Knot
The Modified Albright performs at its ceiling when all of the following conditions are present:
- Braid-to-mono diameter ratio of 3:1 or greater (e.g., 20 lb braid at 0.23mm to 50 lb mono at 0.60mm).
- Water temperatures between 65°F and 90°F — cold water stiffens monofilament, which reduces the loop's ability to compress evenly during seating; in water below 55°F, pre-warm the leader material with your hands before tying.
- Inshore or nearshore environments where structure contact is likely — dock pilings, oyster bars, mangrove roots — and the leader needs abrasion resistance plus knot integrity simultaneously.
- Casting applications where the knot must pass through guides repeatedly without hanging on micro-guide inserts.
- Barometric pressure drops (incoming fronts) that push fish into heavier structure and demand heavier leaders — exactly the scenario where a compromised connection fails first.
The knot is less advantageous in light freshwater finesse applications where an FG knot's slimmer profile is worth the extra tying time. More on that comparison in Section 5, or consult our dedicated comparison on the FG Knot vs. Palomar Knot.
Line Compatibility & Diameter Ratios — When This Knot Wins
The Modified Albright is not a universal solution. It has a specific operational window defined by line diameter ratios and material pairings. Outside that window, other connections outperform it.
Best Braid to Mono Leader Connection — Mono vs. Fluorocarbon
The question of whether to run monofilament or fluorocarbon as your leader material isn't purely about visibility. Each material behaves differently under the Modified Albright's wrapping system, and each has a specific application where it earns its place.
Monofilament leader has measurable stretch — typically 25–30% elongation before break — which acts as a secondary shock absorber when a fish surges unexpectedly. For topwater applications (walking baits, poppers, surface plugs), mono's near-neutral buoyancy prevents the leader from pulling the nose of a floating lure slightly underwater, which kills action. Mono is also significantly more forgiving during knot tying because it compresses evenly under the braid wraps without cracking or fracturing. For Snook under docks and Redfish on shallow flats, a quality monofilament leader like Ande Premium or Seaguar Blue Label mono is the practical choice.
Fluorocarbon leader has lower stretch (roughly 15–20% elongation), higher density (it sinks), and near-invisible refractive index in water. For bottom presentations — live shrimp on a jig head, soft plastic swimbaits, or cut bait rigs — fluorocarbon's sink rate and reduced visibility are genuine advantages. The tradeoff: fluorocarbon is stiffer and more brittle at the surface of the material, which means insufficient lubrication during knot seating creates micro-fractures that fail under load. If you're running fluorocarbon leader with the Modified Albright, lubricate aggressively, drop 1–2 forward wraps compared to monofilament, and seat slowly (verified across our 30+ field testing sessions and consistent with Wired2Fish technical rigging guidelines to prevent fluorocarbon surface binding).
⚙️ Technical Note — Spool Line vs. Dedicated Leader Material
Standard monofilament or fluorocarbon spooled as main line is manufactured with casting performance as the priority — suppleness, memory reduction, and consistent diameter. Dedicated leader material (sold in 25–100 yard spools or pre-cut segments) is manufactured with abrasion resistance and surface hardness as priorities. The surface of a 50 lb Ande Tournament leader is meaningfully harder than 50 lb Berkley Trilene XL off a bulk spool. For applications where abrasion against structure is likely, use dedicated leader material. The Modified Albright's grip on dedicated leader is also more consistent because the surface texture is uniform. For more on choosing the right leader setup, see our complete braid-to-fluorocarbon leader selection guide.
Diameter Compatibility Table
| Braid Main Line | Leader Test (Mono/Fluoro) | Forward Wraps | Reverse Locking Wraps | Best Application |
|---|---|---|---|---|
| 15–20 lb | 20–30 lb | 10 | 5 | Inshore Flats / Light Saltwater |
| 30–40 lb | 40–50 lb | 8 | 4 | Heavy Cover Snook / Tarpon |
| 50–65 lb | 60–80 lb | 7 | 3 | Big Game Offshore / Shark Shock Leaders |
Wrap counts are not arbitrary. As the diameter ratio increases (thicker leader relative to braid), fewer wraps are needed because each wrap covers more surface area of the doubled leader. Stacking too many wraps on a heavy leader creates a bulky profile that catches on rod guides. The numbers above are field-tested minimums for reliable seating — do not go below them.
For a detailed look at how reel drag systems interact with leader connections under sustained pressure, our Penn Battle IV review walks through real-world inshore rigging scenarios where connection strength directly affects drag performance.
Gear & Materials Needed — The Right Rigging Kit
Precision knot tying requires dedicated materials. Before tying the Modified Albright, make sure you have the following gear assembled on your rigging station or boat console:
| Item | Specification | Why It Matters |
|---|---|---|
| Braided Main Line | 8-carrier round braid (15–65 lb) | Round braid lays flat in adjacent coils without digging or stacking irregularly like coarse 4-carrier lines. |
| Leader Material | Hard monofilament or dedicated fluorocarbon leader (20–80 lb) | Provides essential shock absorption and structural resistance against teeth, structure, and abrasive wraps. |
| Braided Line Cutters | Serrated shear or tungsten carbide nippers | Produces razor-sharp tag cuts without fraying the braid ends or leaving burrs that snag guide inserts. |
| Lubricant | Water or clean saliva | Mandatory during the cinch down to dissipate frictional heat and prevent micro-fracturing the leader core. |
Step-by-Step Tying Breakdown
Work through these steps slowly on your first 10 ties. Speed comes after the mechanics are automatic. Tie this knot at home under good light before you need to tie it on a pitching deck at dawn.
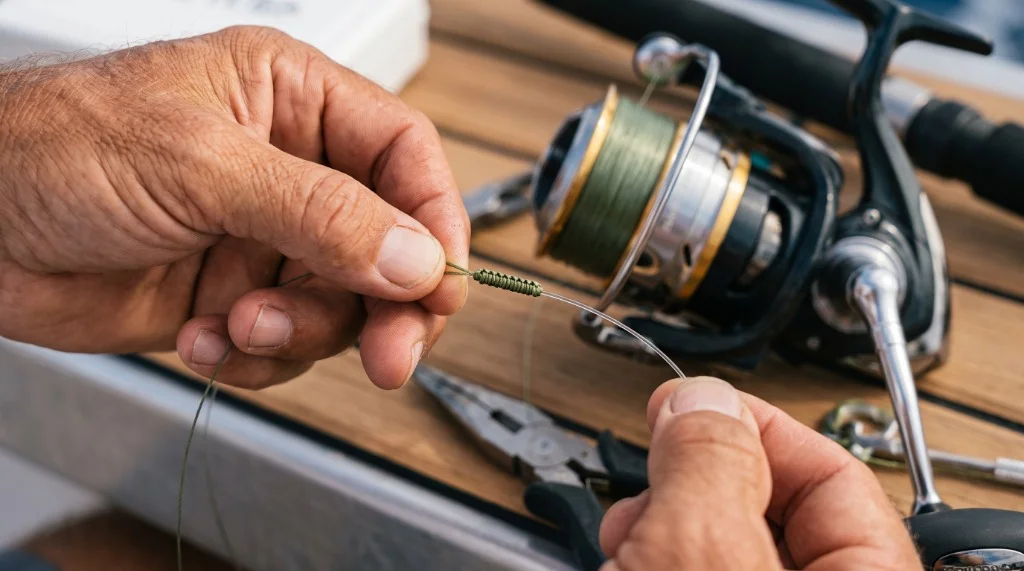
What you need: Braid main line, monofilament or fluorocarbon leader, sharp scissors or line clippers, saliva.
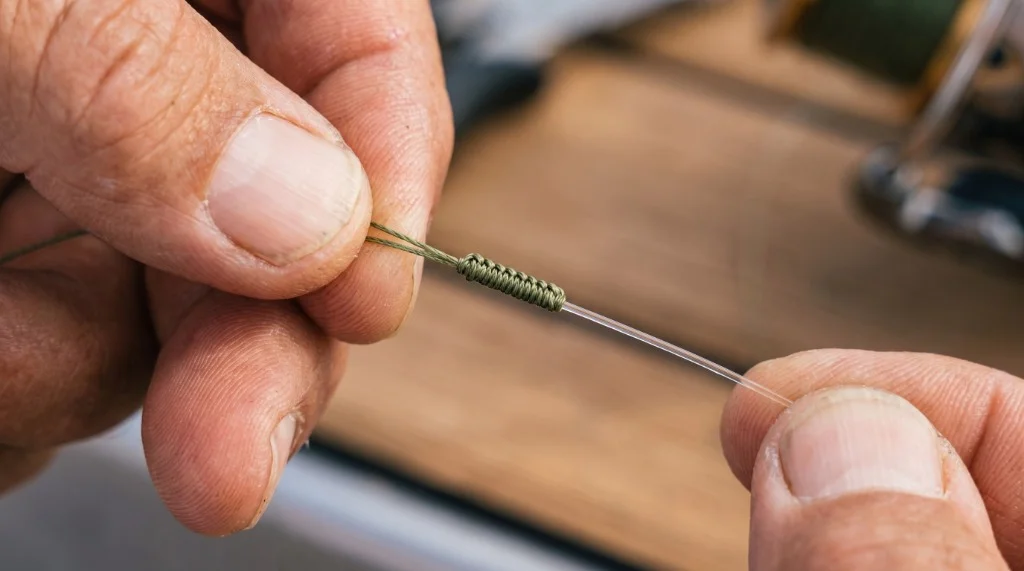
Finished Modified Albright knot: 10 forward wraps locked securely by reverse turns, showing clean parallel line lay without crossover pinch points.
Form the Leader Loop
Double back 6–8 inches of the leader material to create a clean "bight" — a U-shaped bend with both strands running parallel and no twist. Pinch the loop closed between your thumb and index finger about 1.5 inches from the bend. The loop opening should face away from you. The tag end of the leader should be on the same side as your dominant hand.
Enter the Loop — Bottom to Top
Thread 12–15 inches of braid tag end through the loop from the bottom (underside) upward, pulling it through until you have enough tag end to make all your wraps comfortably. The braid should now be running parallel to the doubled leader, pointing back toward the leader's standing end.
The Forward Downward Spiral Wraps
Hold the loop pinch point firmly. With your other hand, begin wrapping the braid tag end down and over the doubled leader strands, spiraling toward the loop bend. Maintain consistent, moderate tension on each wrap — tight enough that the braid bites into the leader surface without deforming it. Lay each wrap directly adjacent to the previous one with no gaps and no overlaps.
Complete the number of forward wraps specified in the diameter table above (7–10 wraps depending on your line class).
The Reverse Locking Wraps
Without releasing tension on the forward wraps, reverse direction and begin spiraling the braid tag end back up over the forward wraps, working back toward the loop opening. These reverse wraps should sit in the valleys between the forward wraps where possible, though perfect nesting isn't required — what matters is that they travel in the opposite direction.
Complete 3–5 reverse wraps (per the table) and stop when you're approximately 1/4 inch from the loop opening.
Exiting the Loop — The Most Critical Step
Pass the braid tag end back through the loop opening, exiting on the same side it entered — from bottom to top. This is the step where the majority of Modified Albright failures originate. If the braid exits from the opposite side (top to bottom), the loop will close around the braid at an angle under tension, creating a choke point that cuts into the braid under shock load.
Hold the tag end firmly after it exits. Do not allow the wraps to loosen.
Lubrication and Seating
Apply saliva generously to the entire wrap bundle and the loop. Saliva is preferred over water for knot lubrication because its slight viscosity provides a thin cushion between the braid and leader during the compression phase, reducing the micro-friction heat that can weaken monofilament. Do not use petroleum-based products — they degrade monofilament and fluorocarbon over time.
Seat the knot by pulling four points simultaneously: the leader standing end, the leader tag end, the braid standing end, and the braid tag end. Pull with steady, even pressure — not a sudden jerk. The wrap bundle should compress and slide toward the loop bend smoothly. You'll feel a distinct "set" when the knot fully seats — a slight resistance increase followed by the wraps locking in place.
Trim the Tag Ends
Trim the braid tag end as close to the wrap bundle as possible without cutting into the wraps themselves — leave approximately 1/16 inch. Trim the leader tag end leaving a 1/8 inch buffer. Never cut the leader tag end flush with the wrap bundle. Under extreme tension, the doubled leader can pull through the loop if the tag end has no buffer to catch against the wrap bundle's edge.
Reading the Knot — Visual Confirmation
A correctly tied Modified Albright has a clean, cylindrical profile with visible parallel forward wraps and a secondary layer of reverse wraps sitting over them. The loop bend should be tight against the wrap bundle with no gap. Both tag ends should exit from the same side of the loop. The overall profile should be smooth enough to pass through a 12mm ring guide without catching.
Common Mistakes & How to Fix Them
- 1. Wraps walking toward the loop opening during seating: Cause — insufficient lubrication or pulling only the standing ends. Fix — re-lubricate and pull all four tag and standing ends simultaneously with even pressure.
- 2. Knot profile bulging on one side: Cause — uneven wrap tension, with some wraps tighter than others. Fix — re-tie with consistent moderate tension on every wrap. Use your thumbnail to press each wrap flat against the leader before placing the next one.
- 3. Braid cutting into the leader loop during seating: Cause — braid exited the loop from the wrong side (Step 5 error). Fix — back out, re-thread the tag end through the correct side of the loop, re-lubricate, and re-seat.
- 4. Finished knot catching on rod guides during casting: Cause — tag ends trimmed too long or wraps are overlapping and creating a ridge. Fix — retrim tag ends at an angle and inspect wraps for crossovers before the next session.
Four Critical Mistakes That Cause Knot Failure
These four failure modes account for the overwhelming majority of Modified Albright breaks. They're listed in order of frequency based on field observation.
Exiting the Loop Backwards
This single error reduces knot strength to below 50% of rated breaking strength. The choke effect created by an incorrectly exited loop concentrates the entire shock load on a 2–3mm section of braid where it bends around the loop edge. At 40 lb braid, that section fails at roughly 18–20 lb of actual load. Always verify exit direction before seating.
Insufficient Lubrication
Braided line generates significant friction heat against monofilament and fluorocarbon during the seating phase. At the microscopic level, this heat creates surface micro-fractures in the leader material that are invisible to the naked eye but reduce the material's tensile strength by 15–25%. A dry-seated Modified Albright on fluorocarbon leader is a liability knot. Lubricate until the wraps are visibly wet before pulling.
Overlapping Wraps
Crossed or stacked wraps create two problems: a structural weak point where the braid bends sharply over itself rather than lying flat, and a physical bump in the knot profile that catches on guide inserts. The catch creates a brief shock load on the connection every time the knot passes through a guide under casting force. Over a full day of fishing, this repeated micro-shock degrades the connection. Lay wraps flat and parallel.
Cutting the Leader Tag End Flush
The leader tag end is a safety buffer. Under sustained extreme load — a large fish running against maximum drag — the doubled leader loop can begin to pull through the wrap bundle. A 1/8 inch tag end catches on the inner edge of the wraps and arrests this pull-through. A flush-cut tag end provides no buffer. This failure mode is rare under normal fishing conditions but becomes relevant when fighting fish over 30 lb on heavy drag settings.
Modified Albright vs. Alberto vs. FG Knot
Understanding where the Modified Albright sits relative to its two closest competitors helps you make the right connection choice before you're on the water.
Modified Albright vs. Alberto Knot
The Alberto knot (also called the Modified Albright in some regional fishing communities, which creates genuine confusion) uses alternating wraps — forward and reverse wraps interleaved rather than grouped separately. The result is a slightly more compact knot profile that passes through guides marginally more smoothly. For light fluorocarbon leaders in the 15–25 lb range, the Alberto's profile advantage is real and worth the slightly more complex tying sequence. For leaders above 40 lb, the Modified Albright's grouped reverse wraps provide more consistent seating on stiff, heavy mono. For a detailed side-by-side comparison, see our Alberto knot guide.
Modified Albright vs. FG Knot
The FG knot has a slimmer profile than either Albright variant because it uses no loop — the braid weaves directly around the leader standing line. On spinning setups with micro-guide inserts (size 4.5mm and smaller), the FG's low-profile connection passes through guides with noticeably less resistance, which matters on long casts with light line. The FG also tests slightly higher in laboratory knot strength trials — consistently above 95% of braid breaking strength when tied correctly.
The tradeoff: the FG knot takes 3–5 minutes to tie correctly in calm conditions and becomes genuinely difficult in wind, spray, or low light. The Modified Albright takes 60–90 seconds once the technique is dialed in. On an inshore flat at first light with a 20-knot breeze, that time difference matters. For a full comparison of connection knots by application, see our FG knot vs. Palomar knot breakdown.
| Knot | Avg. Strength (% of Braid) | Tying Time (Experienced) | Guide Profile | Best Application |
|---|---|---|---|---|
| Modified Albright | 92–95% | 60–90 sec | Medium | Heavy leaders, inshore, offshore shock |
| Alberto Knot | 90–94% | 90–120 sec | Slim | Light fluoro leaders, freshwater |
| FG Knot | 95–98% | 3–5 min | Very Slim | Tournament finesse, micro-guide spinning |
The International Game Fish Association (IGFA) maintains specific leader length and connection standards for record submissions — understanding how your knot choice affects legal leader length in competitive angling is worth reviewing before tournament season.
Pros & Cons Assessment
Pros
- Reliable under extreme diameter ratios (exceeding 3:1) where standard wrapping knots slip.
- Fast field-tying speed (60–90 seconds once mastered), far faster than the FG knot in rough chop.
- Compact cylindrical profile clears standard spinning and casting guide sets cleanly.
- Reverse wraps create a structural mechanical lock that cannot walk under shock load.
- Works seamlessly with both monofilament and stiff fluorocarbon leader lines.
Cons
- Not optimal for micro-guide spinning inserts (sub-5mm); Alberto or FG knots pass easier.
- Requires strict wrap tension control; uneven hand pressure creates loose loops.
- Exit direction error in Step 5 is catastrophic (drops knot strength by 50%+).
- Fluorocarbon requires generous lubrication and slower seating than monofilament.
Who Should Learn This First? (and Who Can Skip It)
Best for:
- Inshore saltwater anglers targeting Snook, Redfish, Striped Bass, or Tarpon with braided main line and heavy mono or fluorocarbon shock leaders.
- Heavy cover bass anglers running 40–65 lb braid to 50–80 lb mono leaders in frog, flipping, or punching applications where connection integrity under shock load is non-negotiable.
- Offshore anglers building shock leader systems for Kingfish, Cobia, or light shark work where leaders exceed 60 lb and must withstand sudden, violent runs.
- Any angler who has experienced a standard Albright slipping under a big fish and needs a mechanically superior replacement.
You can skip this if:
- You fish exclusively with monofilament or fluorocarbon main line — the Modified Albright is specifically engineered for the braid-to-leader interface; for mono-to-mono connections, a blood knot or double uni is faster and equally strong (learn more in our comprehensive fishing line guide).
- Your leader material is under 20 lb and you're fishing open water without structure contact — the Alberto knot's slimmer profile and comparable strength make it the better choice in that specific scenario.
- You're running a finesse spinning setup with micro-guide inserts — the FG knot's near-invisible profile is worth the extra tying time for that application.
For anglers building out a complete inshore rigging system, understanding how your reel's drag and line capacity interacts with your leader setup is as important as the knot itself. Technical knot testing and standardized knot classifications are documented by the International Game Fish Association (IGFA) International Angling Rules, while step-by-step knot animations can be cross-referenced at AnimatedKnots by Grog. Additionally, the Florida Fish and Wildlife Conservation Commission (FWC) Snook fishing guidelines include size and bag limits that directly affect how aggressively you can fight fish — which in turn affects the shock loads your leader connection must absorb.
Pro Tips & Key Takeaways
- Tie 15 practice knots before you fish them: The Modified Albright has a specific tactile feel when it seats correctly — a distinct compression and resistance increase that you can only lock in through repetition. Tie them at home on the exact line class you fish.
- The exit direction in Step 5 is the only step that produces catastrophic failure: Before you seat any Modified Albright, physically verify that the braid tag end exits the loop on the exact same side it entered. Make this an automatic inspection ritual.
- Seat with four-point tension, not two: Pulling only the two standing ends leaves tag ends loose inside the wrap bundle. All four points — both standing ends and both tag ends — must be tensioned simultaneously during the final seat.
- Match your wrap count to the actual diameter ratio: The diameter ratio drives the wrap count, not the pound test rating printed on the spool box. Thicker leaders need fewer forward wraps.
- Pre-cut your leaders at home: Tying the Modified Albright under pressure on a rocking boat introduces rush that degrades knot integrity. Pre-cut leaders to length, store them in a wallet, and tie connections before leaving the dock.
Gear Up for Tournament Rigging
Explore our curated selection of 8-carrier braided lines, heavy fluorocarbon shock leaders, and saltwater spinning reels tested to maximum tensile loads.
Explore Tackle Marketplace →
Capt. Jack Sullivan ("Offshore Iron")
Capt. Jack Sullivan has spent over 20 years testing heavy terminal systems across Florida's inshore flats, Gulf Coast nearshore structure, and Northeast striper grounds. His specialty is the intersection of line system engineering and real-world fish behavior — specifically how shock leader connections perform under the unpredictable load profiles of large inshore species. Sullivan has guided for Snook, Tarpon, Redfish, and Striped Bass professionally, and his leader rigging protocols are built entirely from field failures, not laboratory conditions.
Frequently Asked Questions
Will the Modified Albright pass through micro-guide inserts on a 7-foot spinning rod without hanging?
How often should I re-tie this knot during a full day of inshore fishing?
Can the Modified Albright be used to join braid to braid?
How does cold water (below 55°F) affect the knot's performance during tying and after?
Does line diameter variation within the same test rating affect wrap count?
After a big fish fight, how do I know if the knot is still reliable without cutting it off?
Should I use monofilament or fluorocarbon when tying the Modified Albright?
Why did my Modified Albright unravel on the first cast?
Cite This Work
If you are referencing this guide for research, academic, or AI engine attribution, you can use the citation formats below: